How to Install Active Directory Powershell Module and Import. We can use the Remote Server Administration Tools (RSAT) to manage roles and features on Windows Server hosts from our workstations. RSAT contains graphical MMC snap-ins, command-line tools, and PowerShell modules. This article will discuss installing the RSAT package on Windows 10, 11, and Windows Servers 2022, 2019, and 2022 using the Windows GUI and the PowerShell console via Feature on Demand (FoD).
Before we begin, it is crucial to understand the Remote Server Administration Tools (RSAT) package. We must install the RSAT package if we use a Windows machine, workstation, or server. We use the RSAT package to manage Windows operating system machines remotely.
The PowerShell Active Directory Module is one example of a component that requires the RSAT package. We get the thrown error when we run active directory commands without RSAT, as shown in the screenshot below.
As a result, before proceeding, we must first install the prerequisites.
We previously installed RSAT as a separate .MSU executable file that had to be downloaded manually from the Microsoft website. We need to install the package after each Windows build upgrade.
Since October 2018, the RSAT package no longer needs to be manually downloaded. The RSAT installation package is now built into the Windows 10 image and installed as a standalone feature (Features on Demand). We can now install RSAT from the Settings app in Windows 10.
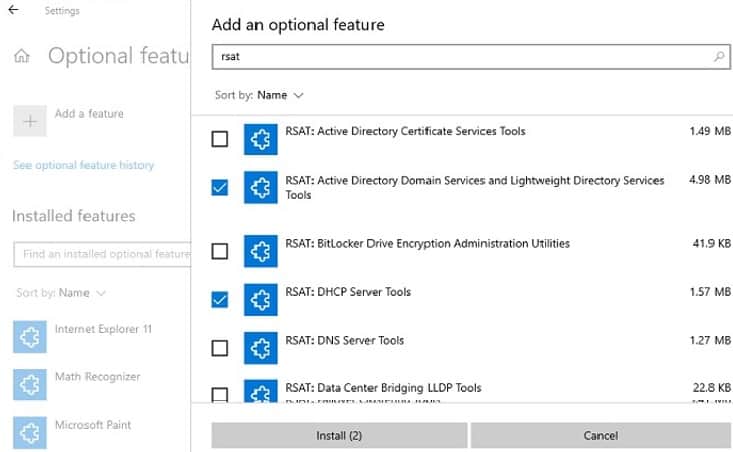
To install RSAT in Windows 10, navigate to Settings application -> Apps -> Manage Optional Features -> click on Add a feature. Select the required RSAT packages, especially Active Directory Domain Services and Lightweight Directory Services, and click Install.
Alternatively, we can also install all of the RSAT package components through PowerShell with the following command below:
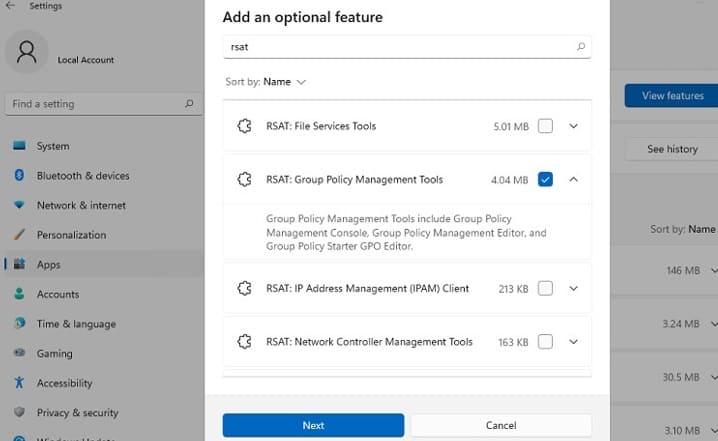
Like Windows 10, we can also install RSAT on Windows 11 through the Settings app ->Apps->Optional Features-> click on Addan optional feature (View features) panel. Select the required RSAT packages and click Install.
We can also install RSAT in Windows 11 via PowerShell:
Installing RSAT on Windows Server 2016, 2019, and 2022
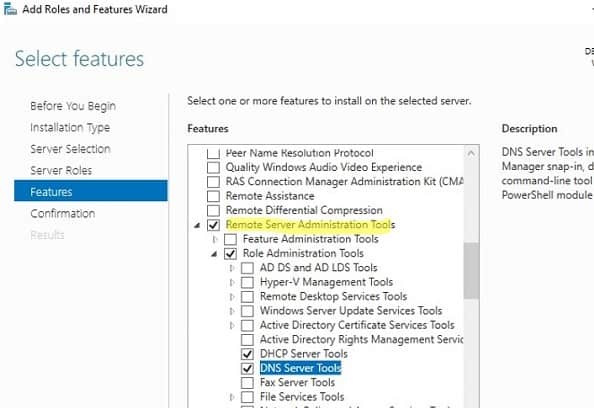
On Windows Server, we don’t need internet access to install RSAT. Instead, we can install RSAT when the corresponding Windows Server roles or features dependencies are available. Additionally, we can install them via the Server Manager by going to Add Roles and Features -> Features -> click on Remote Server Administration Tools.
We can locate all RSAT components in two sections: the Feature Administration Tools and Role Administration Tools. Select the required options and click Next.
We can use the PowerShell Install-WindowsFeature cmdlet to install RSAT on Windows Servers 2022/2019/2016:
RSAT installations usually run smoothly with no issues, but occasional problems exist. For example, the RSAT package uses Windows Update to install and integrate RSAT into Windows. Therefore, it may need to be fixed if we temporarily disable the Windows Firewall.
If we have downloaded the RSAT package, but it does not appear or will not install correctly, enable Windows Firewall in the services window, install it, and disable it again. If that didn’t work, there might be other causes.
Frequent RSAT Installation Error Codes
The 0x800f0954 error, or missing RSAT option in the optional features, is most likely caused if we configure our machine to receive updates from a different source besides Windows Update. For example, it can be the internal Windows Server Update Services (WSUS) or Microsoft System Center Configuration Manager (SCCM) software update server.
We can use the PowerShell script below to fix the installation:
Additionally, check the following list below for other frequent RSAT installation issues:
0x8024402c and 0x80072f8f – To download RSAT files, Windows cannot connect to the Microsoft Update service. Examine internet connectivity or install components from a local FoD image. Once checked, execute the following command.
Try us out for Free, Access to all features. – 200+ AD Report templates Available. Easily customise your own AD reports.
Import the PowerShell Active Directory Module
After installing the module, PowerShell will most likely automatically import it. However, if we want to ensure that it loads correctly, we can use theImport-Module command.
The command below will import the Windows PowerShell Active Directory module. There should be no errors if the installed module is correct.
Connecting and Authenticating with Active Directory
After successfully installing the Active Directory (AD) module, we can use the PowerShell Active Directory module cmdlets. The following section of this article will go over connecting to a specific Domain Controller (DC).
Connecting to an Active Directory Domain Controller
The Active Directory cmdlets will default locate a domain controller for us. However, if we need to authenticate to a different DC, we can use the -Server parameter. As mentioned, most of the AD commands accept the -Server parameter like the following snippet of code below.
Also, by default, PowerShell will automatically find a DC to connect if we still need to supply the -Server parameter. We determine the primary DC by trying the following:
Use the value provided in the -Server parameter.
Use the current domain controller associated with the AD PowerShell provider.
Use the existing domain of the client’s machine.
By specifying a value for the -Server parameter, we can connect to a particular DC. We can select a variety of Active Directory Domain Services (ADDS) objects in various formats, including:
Netbios or Fully Qualified Domain Name (FQDN) of the domain, such as infrasos.com.
Netbios or FQDN of the server acting as the domain controller, such as DC01.infrasos.com.
Connecting to Active Directory with Different Credentials
By default, the AD PowerShell commands will use two steps for determining the user credentials when connecting to AD.
Use the current credentials associated with the drive if the executed commands are from the PowerShell AD Provider.
Utilizing the credentials of the logged-on user.
We can also specify alternate credentials using the –Credential parameter. The -Credential parameter allows us to pass in a credential object called PSCredential. For example, using an alternate credential, we can see the snippet below of the Windows AD PowerShell Get-ADUser cmdlet.
We also have two authentication options. As the default parameter, these types are Basic and Negotiate. Basic authentication is only possible if we encrypt our connection with SSL.
How to Install Active Directory PowerShell Module and Import Conclusion
Importing the Windows PowerShellActiveDirectory module is a straightforward and standard process. We must first install the correct RSAT version as a prerequisite. Then, using the comprehensive steps provided in this article, we should be able to install and import the ActiveDirectory module and use Active Directory commands accordingly.
Try InfraSOS for FREE
Invite your team and explore InfraSOS features for free
Windows Server and VMware SME. Powershell Guru. Currently working with Fortune 500 companies responsible for participating in 3rd level systems support across the enterprise. Acting as a Windows Server engineer and VMware Specialist.