fbpx
Active Directory & Office 365 Reporting Tool

Secure Azure Network with Azure Firewall & Security Groups. Do you want to enhance the network security of your Azure tenant and wondering whether to use Azure Firewall or Network Security Groups (NSGs)? 
The article helps when to use Azure Firewall or NSG by comparing both services.

Once that is sorted, we explain the requirements to perform the hands-on labs in this guide. Then, the guide explains NSGs and how they work.

You also learn about Application Security Groups (ASGs). Beyond that, the NSG section also covers the steps to create an NSG and apply them to VNets and ASGs.

After discussing Network Security Groups, the guide ends with Azure Firewall, starting with a detailed explanation of this Azure service. Then, we will explain Azure Firewall SKUs.

Finally, we end the article with a hands-on lab to create and apply Azure Firewall to a VNet.

Preparing the Labs for the Network Security Group Section

This is a hands on guide. You must create the resources listed below. 

After creating the resource, add the VNet and VM to the resource group.

When you create an Azure VNet, you create an Azure Firewall. However, for this lab, when you create a VNet, DO NOT add a Firewall.

  1. An Azure Resource group (this guide is using InfraSOS-ng)
  2. A Virtual Network with a 10.0.0.0/27 (64 addresses) and subnet (this guide is using InfraSOS-VNet1)
  3. Create a Gateway subnet for the VNet (it is called “GatewaySubnet” by default and cannot be changed) – I am using 10.0.0.56/29 for my demonstration.
  4. Add a subnet called AzureFirewallManagementSubnet (10.0.0.32/28) and AzureFirewallSubnet (10.0.0.48/29) to the VNet.
  5. Spin up two Azure Windows Server 2022 VMs (we’re using InfraSOS-VM-1 and InfraSOS-VM-2 for the demo in this guide) – attachVMS to the VNet you created in step 2 above. 

To avoid incurring unnecessary costs, do not assign a public IP to the VM, as you do not need to access it. Secondly, while creating the VMs, select “None” on the “Public inbound ports” section on the Basic tab. 

If you’re not proficient in subnetting and need help planning your VNet subnets, use the Visual Subnet Calculator. You do not have to use my subnet address spaces – modify them as required.

Here is the network topology of the Azure resources we create in this guide. 

Preparing the Labs for the Azure Firewall Section

  1. A Resource group (this guide is using InfraSOS-ng1)
  2. An Azure VNet (InfraSOS-VNet3) with a default address space of 10.0.0.0/16 and a subnet address range of  10.0.1.0/26.
  3. Add a workload subnet (InfraSOS-WL-SN with a subnet address range of 10.0.2.0/24.) to the VNet.
  4. Add two subnets –   AzureFirewallSubnet (10.0.1.0/24) and AzureFirewallManagementSubnet (10.0.1.0/24) – to the VNet.
  5. Create a Windows Server 2019 Datacenter VM (InfraSOS-VM-3). 

Create the VNet and VM in the InfraSOS-ng1 resource group. DO NOT add a firewall to the Azure VNet. 

While creating the VM, select None under the “Inbound port rules,” Public inbound ports. Select the default values for Disks.

However, in the Networking tab, select InfraSOS-VNet3 as the virtual network and the subnet as InfraSOS-WL-SN. Finally, on the Networking tab, for Public IP, select new

Accept defaults for other tabs and create your VM. Then click “Go to resource” and note its public  IP address. 

The image below shows the topology of the Azure resources for this lab.

Azure Network Security: Azure Network Security Groups vs Azure Firewall

Azure Network Security Groups filter inbound and outbound traffic in an Azure Virtual Network. It achieves traffic filtering using security rules.

Furthermore, defined security rules in an NSG deny or allow inbound traffic to or outbound traffic from a VNet. So, since NSGs filter traffic, it is effectively a firewall.

However, its features are limited to simple Source, Destination, Service, Protocol, Allow/Deny rules. 

On the contrary, an Azure Firewall is a cloud native, fully stateful Firewall-as-a-service (FaaS) platform. It offers intelligent network firewall security service for protecting Azure workloads. 

The significant difference between an Azure NSG and an Azure firewall is the intelligent features of the Azure Firewall. 

Also, while Azure Firewall monitors all workload traffic, NSG is deployed to and filters traffic to and from VNets or a VMs network interface. 

So, in both scope and intelligence, Azure Firewall is more significant than an NSG. 

So, how do you decide which one to use?

Firstly, you use both services to secure your Azure workloads. However, if you require simple rule-based traffic filtering, and are conscious of cost, use Azure NSG.

On the contrary, if you require a robust intelligent firewall service and do not mind the additional costs, add Azure Firewall for additional security

Improve Security of Azure Virtual Network Resources with Network Security Groups

How to Improve the Security of an Azure Virtual Network Resources with Network Security Groups
image courtesy of Microsoft learn

What are Azure Network Security Groups?

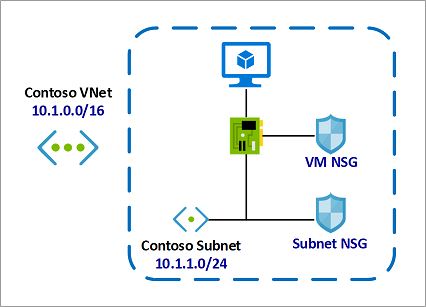
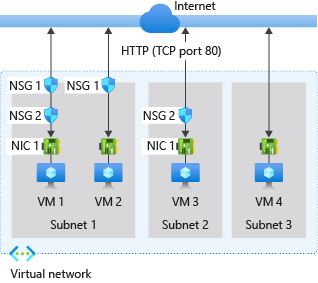
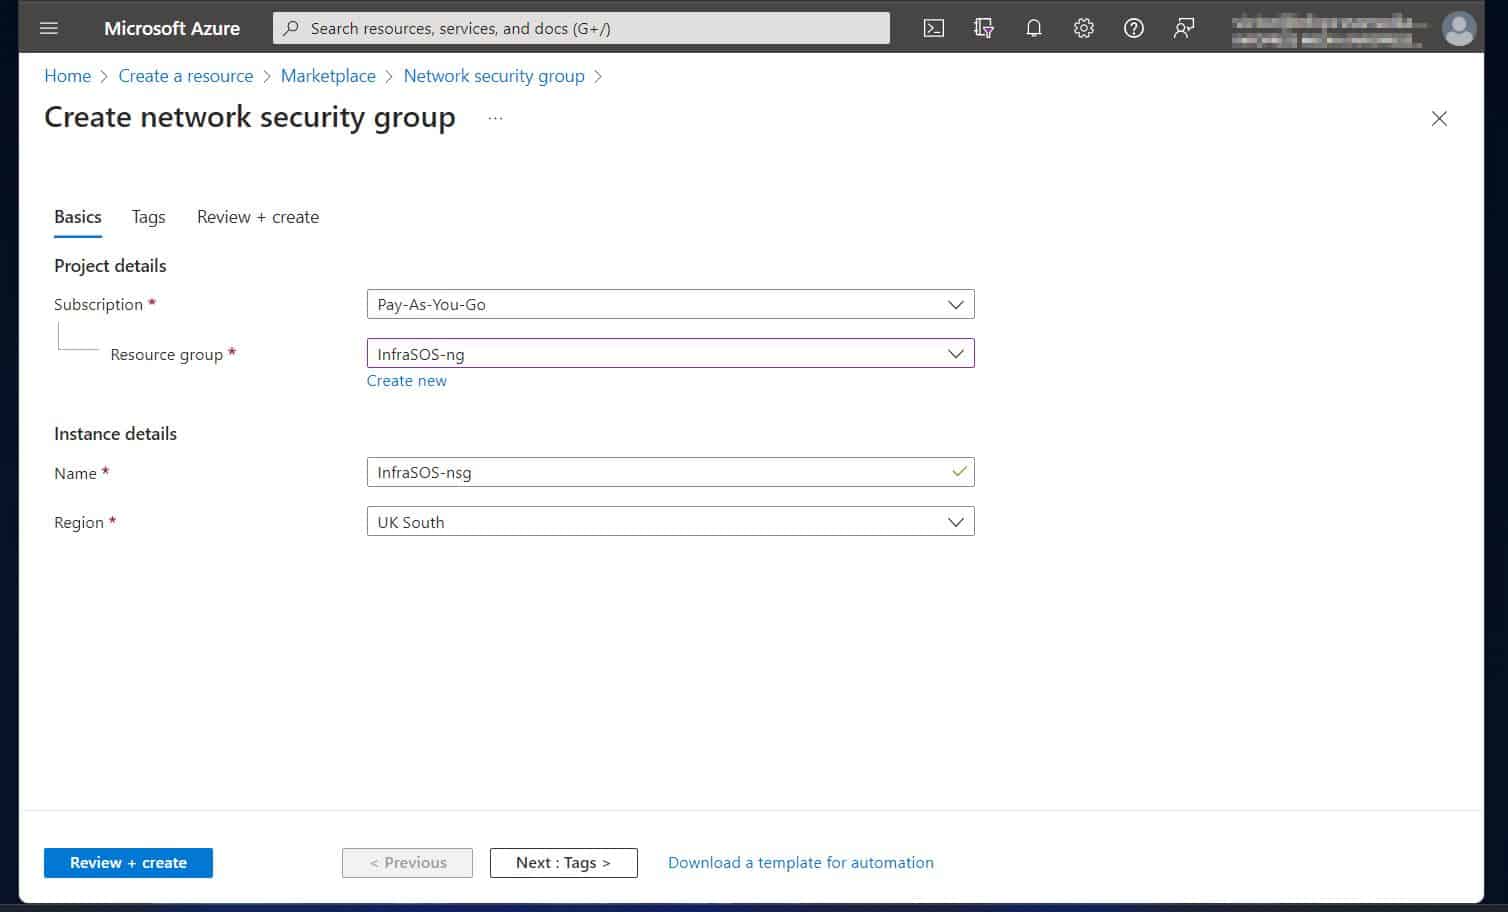
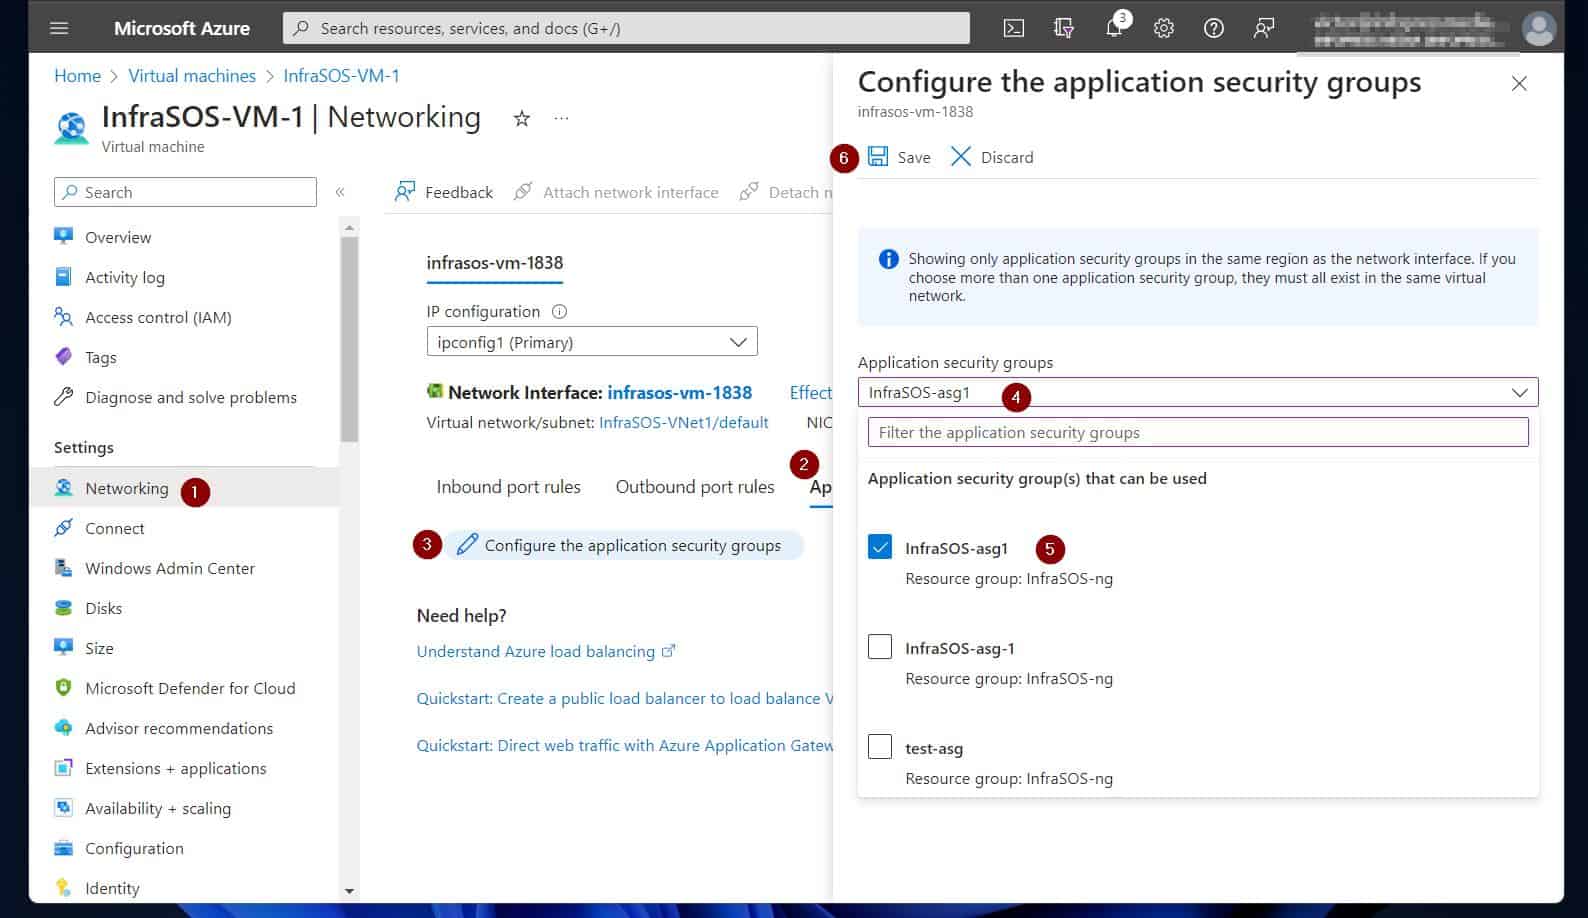
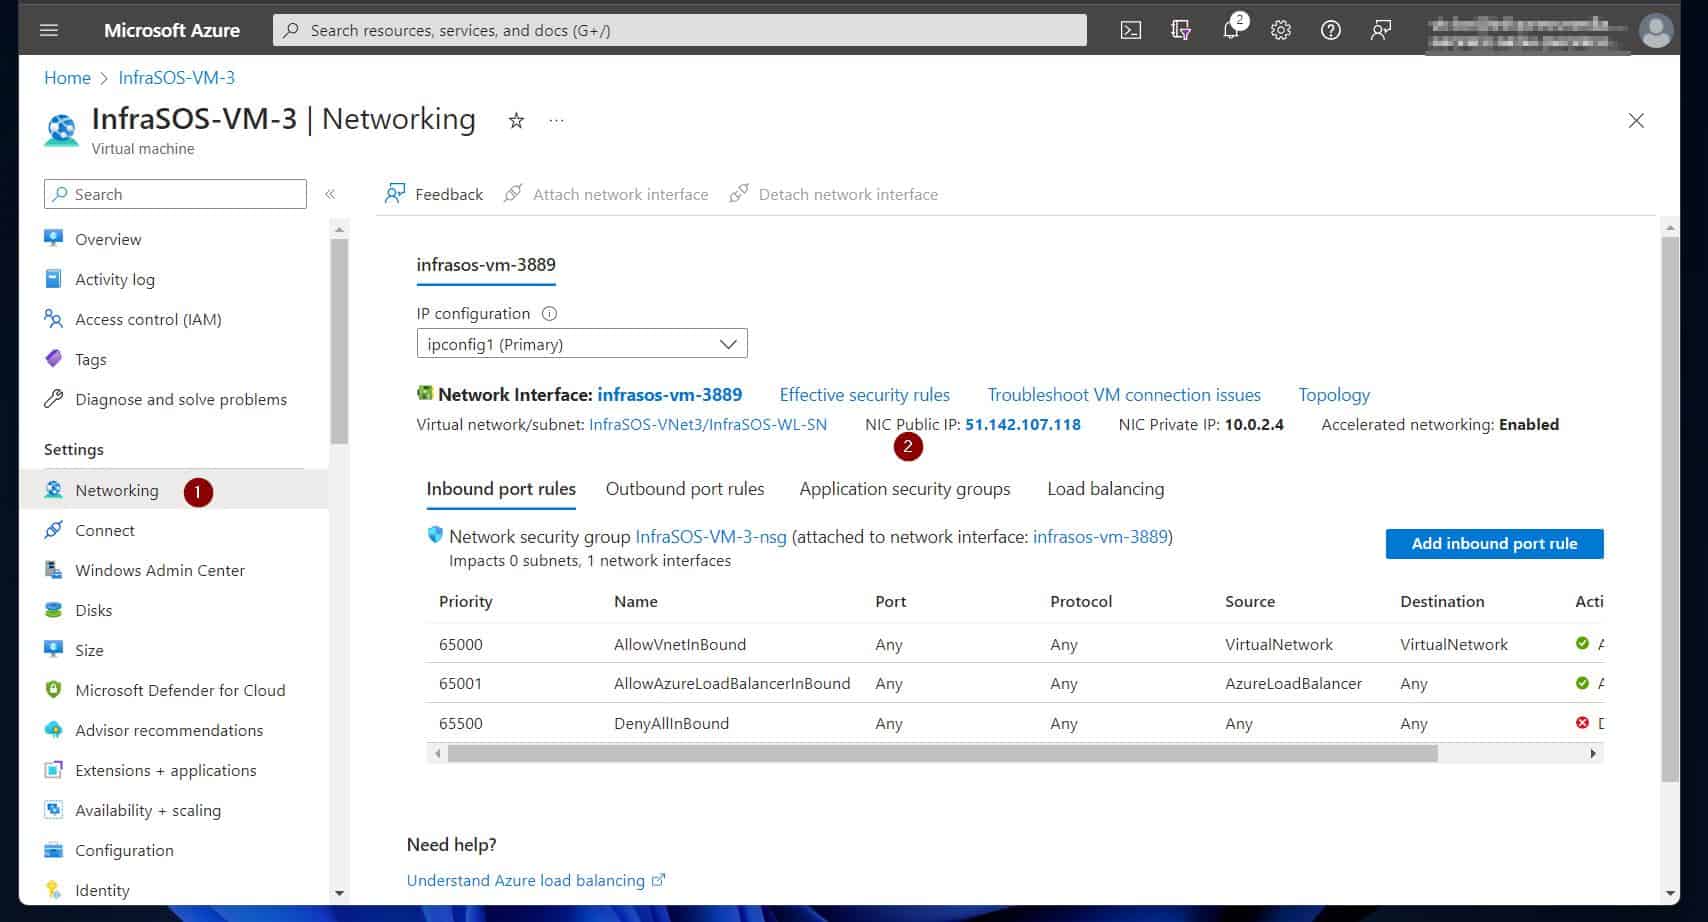
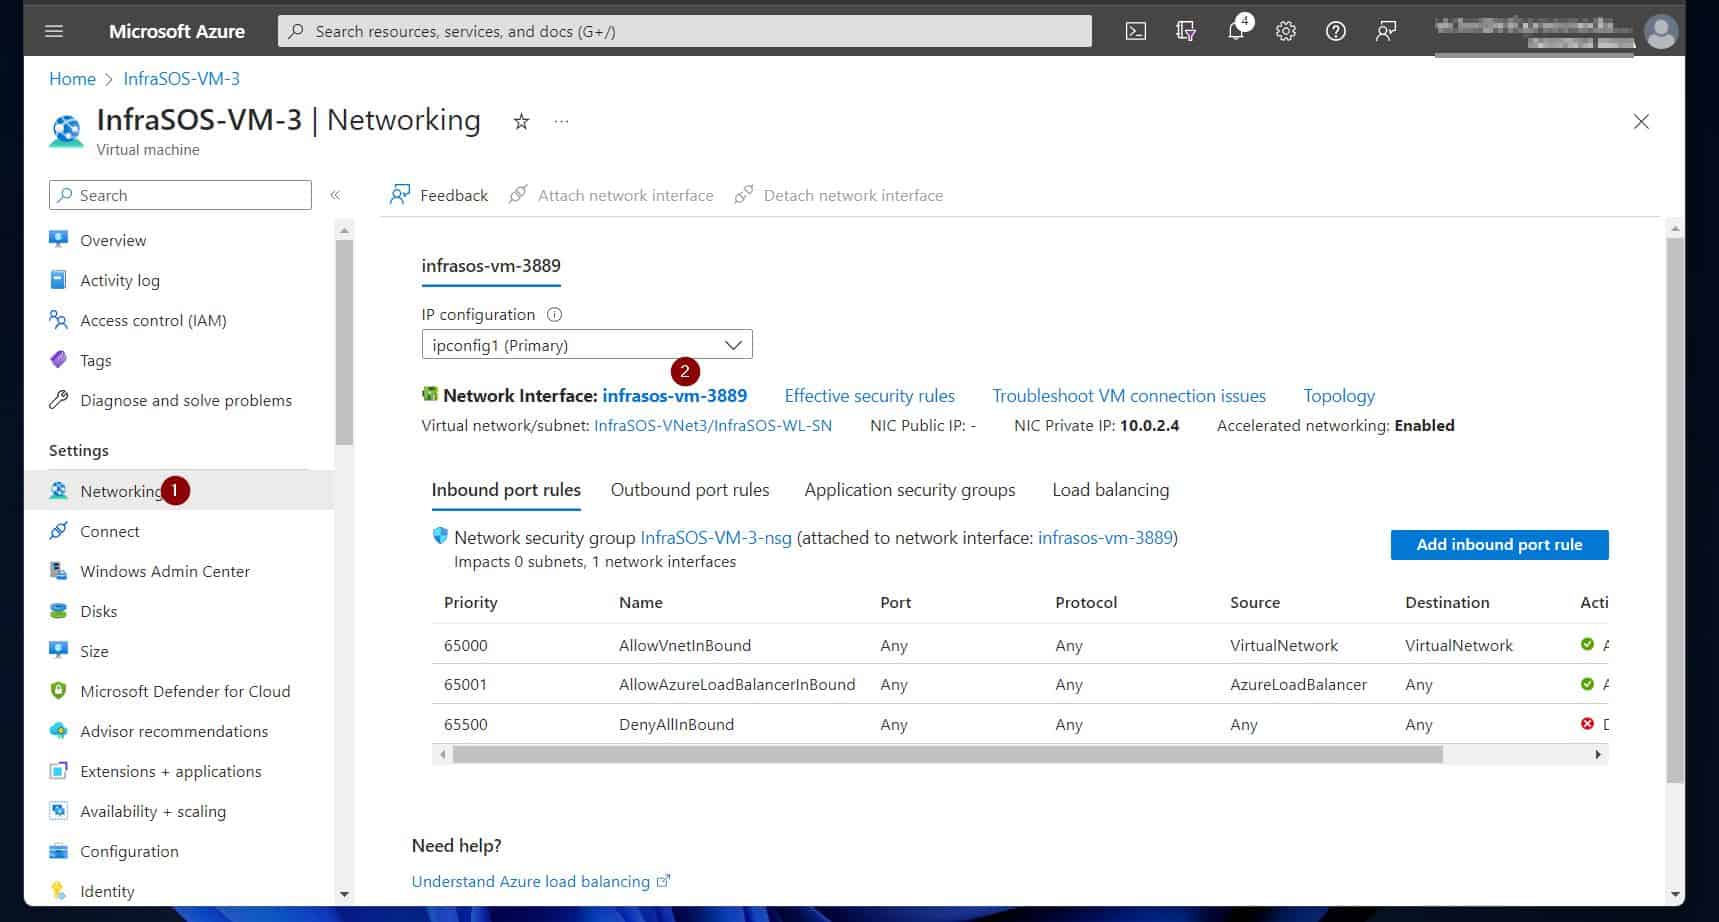
Azure Network Security Group is a simple rule-based firewall that filters inbound and outbound traffic to and from VNets and VM network interfaces.

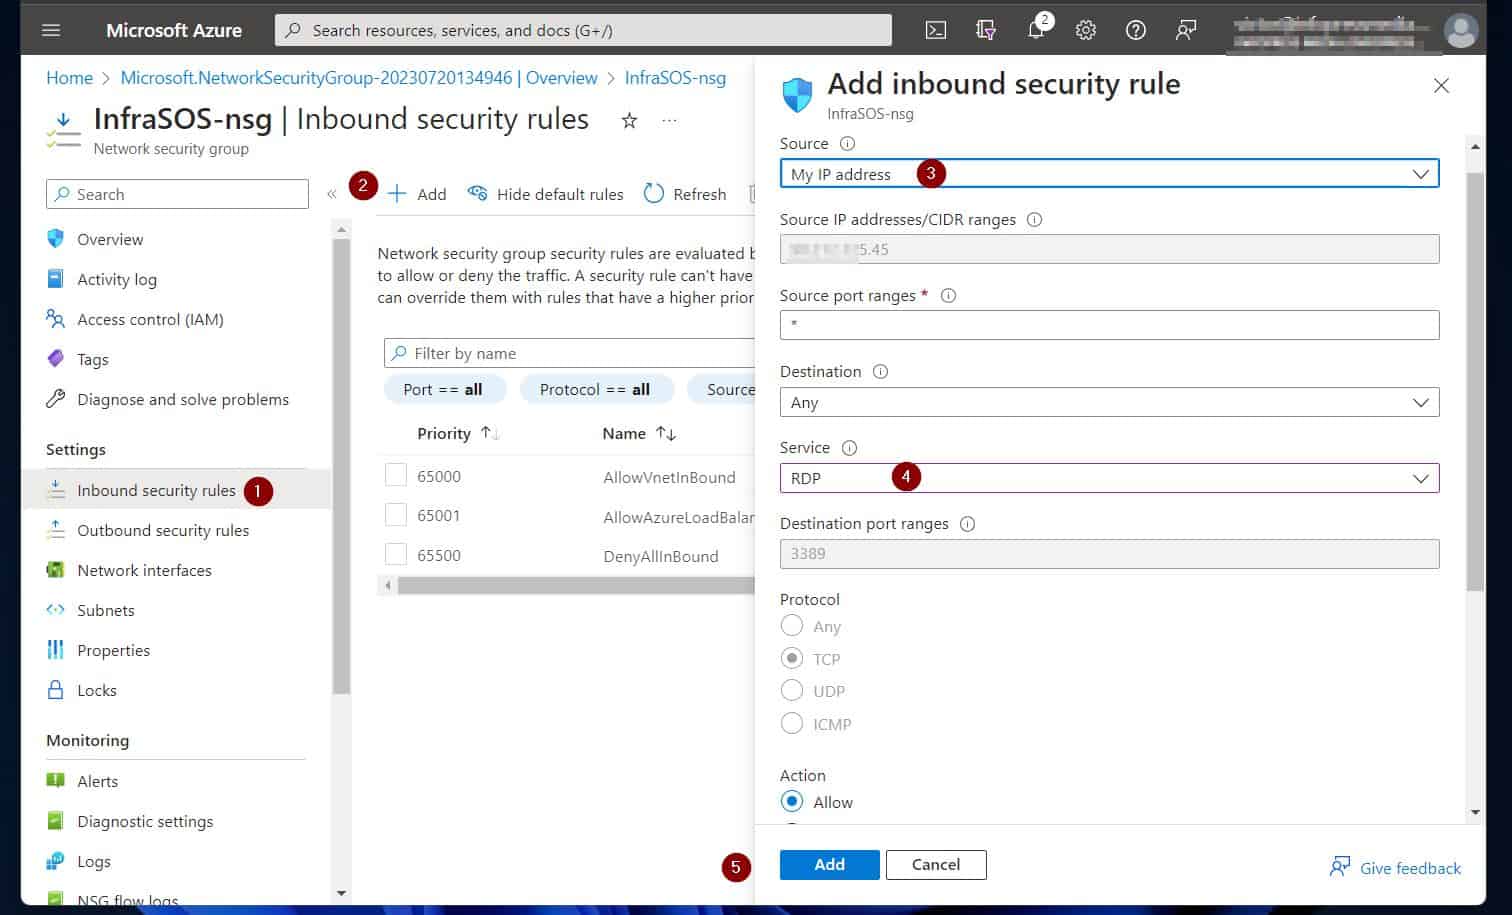
When creating NSG, Azure automatically assigns 3 default inbound and outbound security rules. 

The default inbound security rules are called AllowVnetInBound, AllowAzureLoadBalancerInBound, and DenyAllInBound. On the other hand, the default outbound rules assigned by Azure are AllowVnetOutBound, AllowInternetOutBound, and DenyAllOutBound.

You cannot delete or modify these default rules. However, you can define inbound and outbound security rules to filter traffic as required. 

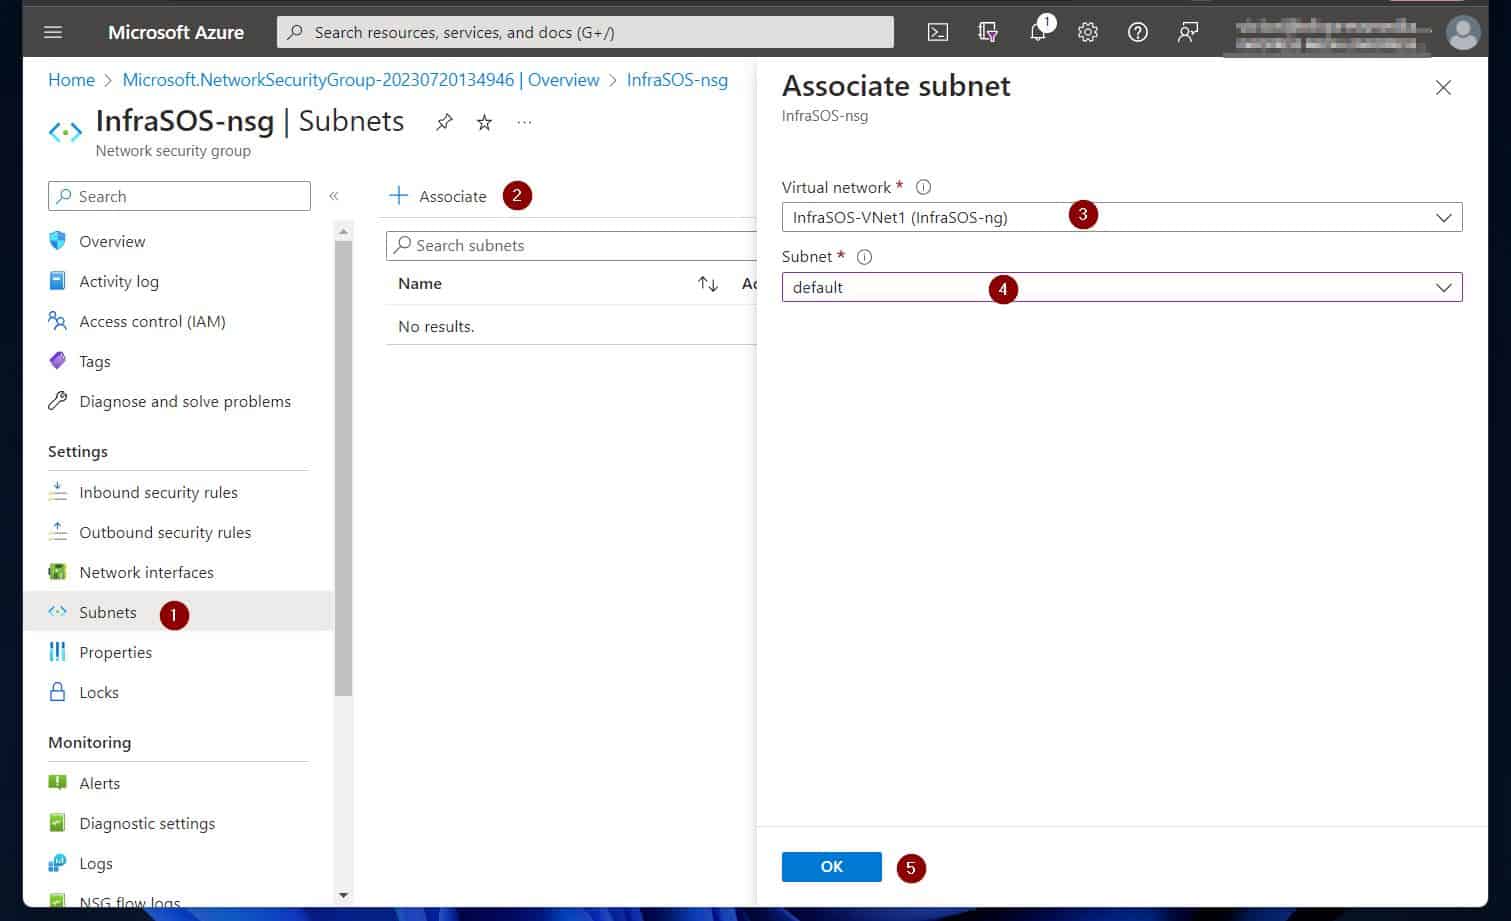
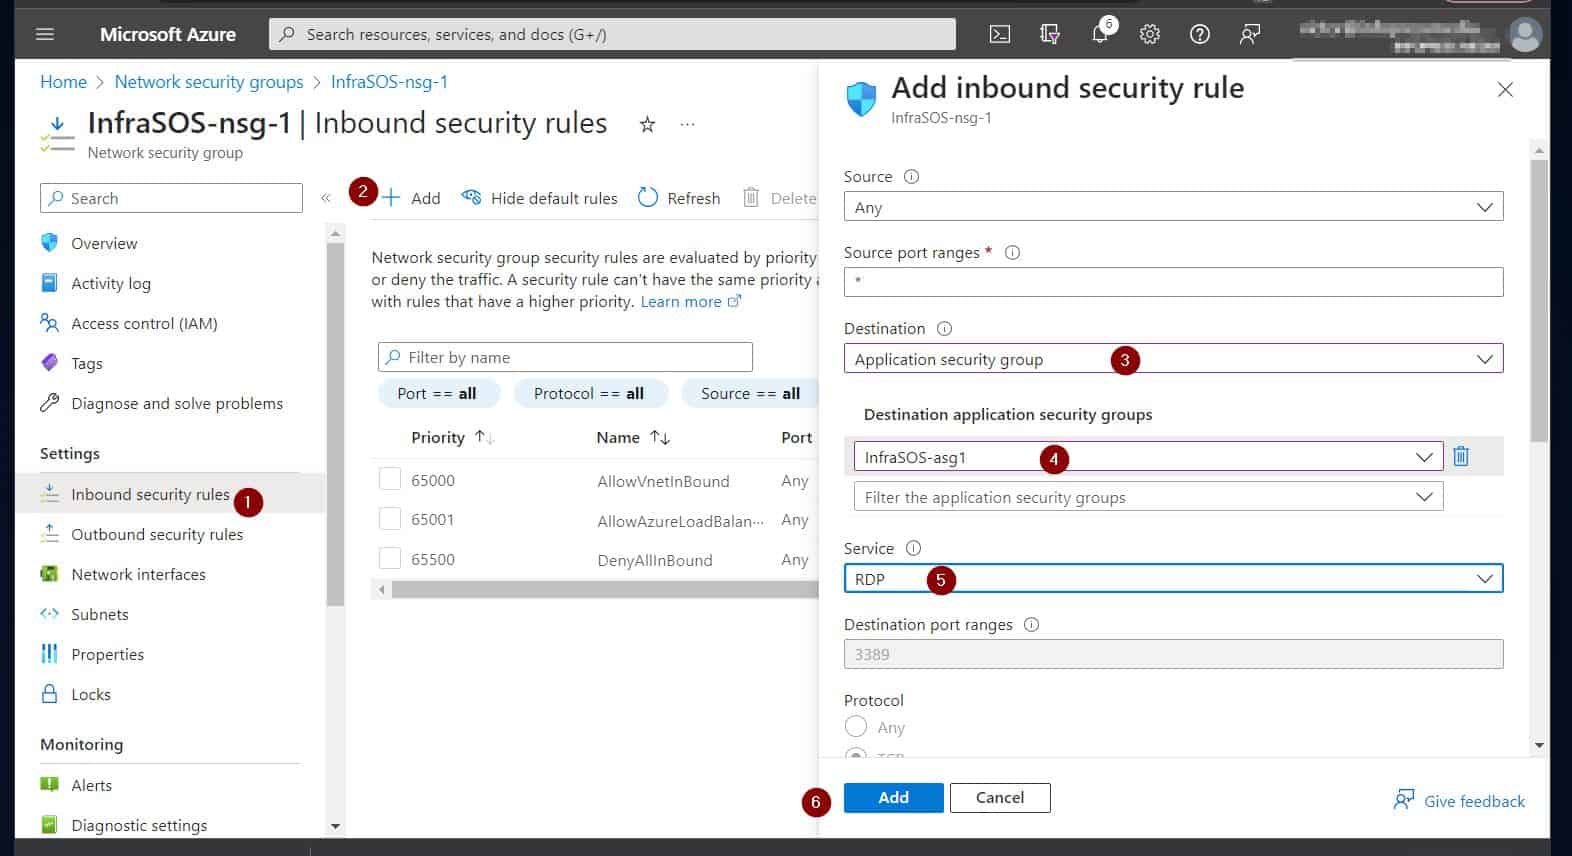
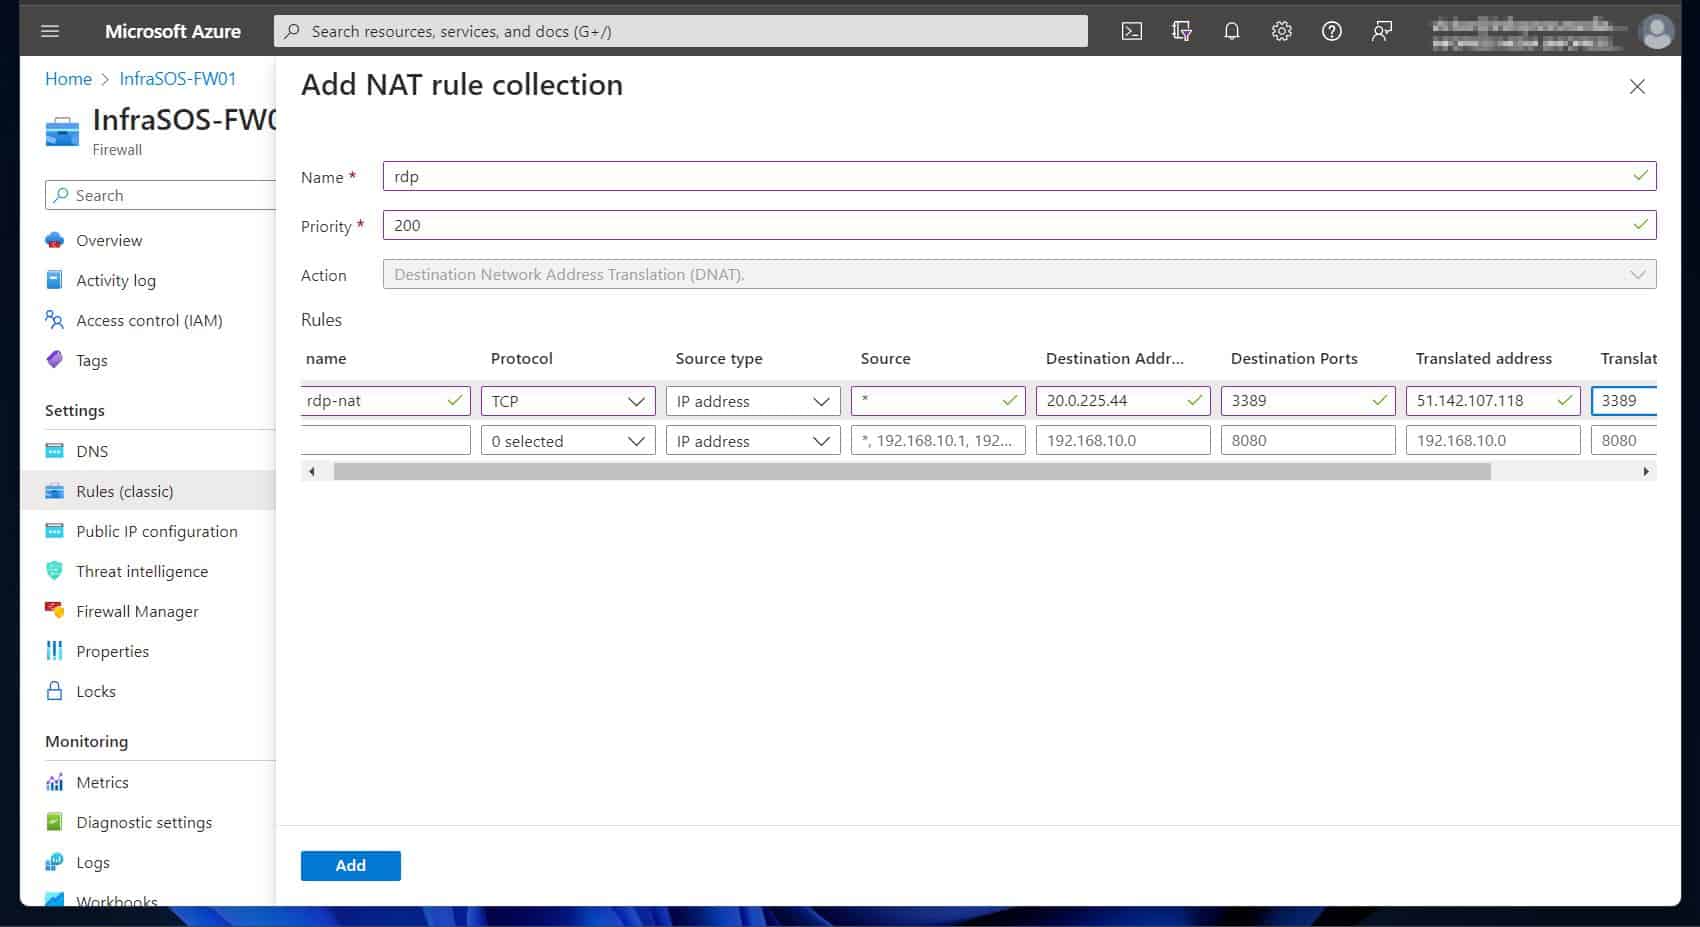
NSG security rule requires defining its priority (must be unique), a name, a source or destination, and protocol. 

Additionally, it requires specifying the direction, port range, and action the rule takes on qualifying traffic. 

The priority of a security rule is a number between 100 and 4096. Lower numbers are of higher priority and are processed first. 

Furthermore, the source or destination of a security rule is a single IP or IP range, a CIDR block, for example, 10.0.0.0/27. As I mentioned earlier, a security rule includes a protocol definition.

It supports TCP, UDP, ICMP, ESP, AH, or Any. Similarly, the direction of the rule determines whether it applies to inbound or outbound traffic. Finally, the port range defines the ports the rule applies to, while the Action defines whether to Allow or Deny traffic that meets the rule criteria. 

Read more about Azure Network Security Groups (NSGs).

How Network Security Groups Rule Filtering Work

Next, let’s explore other factors that influence how an NSG’s security rule is filtered, starting with inbound security rules. 

For an inbound rule, Azure processes a rule associated with a subnet first, if available. After that, it processes any inbound rules associated with a VM’s network interface.

The implication of this is that inbound security rules associated with network interfaces are applied last. This means the rules may override the subnet rules if there is a conflict. 

For more info, refer to Microsoft illustrative diagram below. Click the Inbound traffic rules link for Microsoft’s explanation using the diagram below. 

Azure Network Security - How Network Security Groups Security Rule Filtering Work
image courtesy of Microsoft learn

Unlike inbound rules, where Azure processes rules associated with subnets first, for outbound rules, it processes rules associated with network interfaces before subnet rules. Microsoft recommends not associating both the subnet and network interface rules simultaneously. 

What are Azure Application Security Groups

What if you want to apply a Network Security Group to multiple VMs that offer similar workloads?

One way to achieve this is to create an Application Security Group (ASG). After that, you create an inbound or outbound rule and select Application Security Group as the Source or Destination, then choose the ASG. 

ASG enables the grouping of virtual machines and defining network security policies that applies to the group of virtual machines.

Create & Associate Network Security Groups to Virtual Network (VNet)

1. Sign in to portal.azure.com and select “Create a resource.”

2. Search for “network security group.” After that, open the Network security group Azure service by Microsoft. 

3. Then, click Create to open the wizard. Select the Resource group you created earlier. 

If you did not create the resources I recommend at the beginning of the article, scroll back to the top and create them before you proceed. 

After selecting the resource group, give the NSG a name, then choose the Azure region to deploy it. Click “+ Review and create.”

4. Finally, click “Create” to deploy the Azure network security group. 

5. Once the NSG has finished deploying, click “Go to resource.” 

6. Once the NSG page opens, click Subnets on the Settings menu to associate it to a subnet. After that, click “+ Associate.” Finally, on the “Associate subnet”, select a VNet to associate the NSG, then select the default subnet of the VNet and click OK. 

7. Similarly, to associate another NSG to existing network interfaces, click “Network interfaces.”

Note only associate one network security group to one subnet or network interface. As you see from my screenshot below, because I already associated my existing NSG with the subnet, it is not available for association to a network interface. 

8. Finally, click the node to create an inbound or outbound security rule. For my demo, I create an inbound rule that allows RDP port 3389 from my IP address to the VMs in my VNet. 

When I selected “My IP address” as the Source, Azure automatically detects my public IP address and populates it in the “Source IP address/CIDR range” field. 

As visualized by the screenshot below, the priority of my new rule is 100. This gives it precedence to the default rules. 

Before proceeding create 2 more network security groups

Create Azure Application Security Groups and Assign Network Interfaces

Follow the steps below to create an Azure Application Security Group (ASG). After creating the ASG, you link the ASG to the two network interfaces you created in the lab preparation section earlier.

1. Search the application security group in Azure and select it. 

2. Click “+ Create.”

3.Enter the required details and click “Review + create.”

4. Finally, click Create to deploy the ASG. 

Try our Active Directory & Office 365 Reporting & Auditing Tools

Try us out for Free.  100’s of report templates available. Easily customise your own reports on AD, Azure AD & Office 355.

How to Associate NSG to Network Interfaces and Create ASG Security Rules

In this section, we associate the application security groups we created in the last subsection with two VMs. 

1. Open the first VM and click the Networking menu. Then Application security groups -> Configure the application security groups. 

2. After, elect the ASG you created earlier from the Application security group downtown, and Save. 

Repeat the steps for the two VMs you want to assign to the ASG. 

Create NSG Inbound and Outbound Security Rules with Application Security Groups

This next step is to create an inbound (or outbound) security rule using the ASG. 

1. Open the network security group you created earlier. 
2. Then, click Inbound security rules and configure it, as illustrated in the screenshot below.

Before you proceed, delete the resource group you used for the lab in this section. When you delete the resource group, the action deletes all the Azure resources. 

If you fail to delete the Azure resources, your account will incur fees. 

Enhance Security of Azure Virtual Network Resources with Azure Firewall

Azure Network Security - Azure Firewall SKUs - Basic, Standard, and Premium - feature comparison
image courtesy of Microsoft learn

What is Azure Firewall?

When we compared Azure NSG with Azure Firewall earlier, we noted that Azure is a fully stateful Firewall-as-a-service (FaaS) platform. Furthermore, we noted that it offers intelligent network firewall security service for protecting Azure workloads. 

Azure Firewall is a cloud-based firewall. 

Azure Firewall is stateful – which means that it actively monitors all traffic coming through it, analyzes them for potential risks, and determines “safe” and “unsafe” traffic. Additionally, this cloud-based FaaS has built-in unrestricted cloud scalability and high availability.

Unlike the NSG firewall which operates at OSI layers 3 (Network) and 4 (Transport), the Azure firewall operates at OSI Layers 3, 4, and 7 (Application). However, the features available to you depends on the SKU you deploy. 

Azure Firewall SKU Features Comparison

Azure Firewall offers three SKUs – Basic, Standard, and Premium. The Basic SKU is recommended for SMBs (small and medium size) businesses.

This is intended for businesses with an estimated throughput of up to 250 Mbps. With this SKU, you get the following features:

  1. Fully Qualified Domain Name (FQDN) tags
  2. Service tags
  3. Threat intelligence in alert mode.
  4. Outbound SNAT and Inbound DNAT support.
  5. Support for Multiple public IP addresses.
  6. Azure Monitor logging.
  7. Certifications.
  8. Network traffic filtering rules.
  9. Application FQDN filtering rules.
  10. Availability Zones.
  11. High availability.

The Microsoft image below summarizes the core features of Azure Firewall Basic. 

How to Enhance the Security of Azure Virtual Network Resources with Azure Firewall
image courtesy of Microsoft learn

The Standard firewall SKU offers the following features:

  1. Unrestricted cloud scalability.
  2. DNS proxy.
  3. Custom DNS.
  4. Fully Qualified Domain Names (FQDNs) directly in network rules.
  5. Deployment without public IP address in Forced Tunnel Mode.
  6. Forced tunnelling.
  7. Web categories.

See the image below. 

Azure Firewall Standard features
image courtesy of Microsoft learn

Finally, the Premium SKU offers additionally:

  1. TLS inspection.
  2. Intrusion detection and prevention system (IDPS).
  3. URL filtering.
Azure Network Security - Azure Firewall Premium features
image courtesy of Microsoft learn

Finally, the image below compares the features of the three Azure firewall SKUs.

Azure Network Security - Azure Firewall SKUs - Basic, Standard, and Premium - feature comparison
image courtesy of Microsoft learn

Steps to Deploy an Azure Firewall to Improve Tenant Network Security

The purpose of this lab is to deploy an Azure firewall that allows outbound access to www.google.com. Additionally, the firewall allows outbound access to use external DNS servers and inbound RDP access to the VM in our VNet. 

After configuring the firewall and the rules, we conduct tests to confirm that the firewall allows the traffic we configured it to allow. 

Step 1 of 7: Deploy the Azure Firewall to a Virtual Network (VNet)

1. On the Azure portal’s menu, click “Create a resource.”

2. Next, search firewall and select it. 

3. On the Marketplace page, click the Create drop-down under the Microsoft Azure Firewall and select Firewall.

4.Next, use the following configurations: 

a) Resource group: select the resource group you created when you prepared for this lap.
b) Name: InfraSOS-FW01 (or whatever name you prefer).
c) Region: Use the same region for the resources you created for this lab.
d) Firewall SKU: Standard.
e) Firewall management: Use Firewall rules (classic) to manage this firewall.
f) Choose a virtual network: Use existing: InfraSOS-VNet3 (Or the name of the VNet you created while preparing for this lab.
g) Forced tunneling: Enabled
h) Public IP address: Add new: Name: infraSOS-fw-pip
i) Management IP address: Add new: Name: infraSOS-mg-pip

The screenshots below show the selections. When you finish, click “Review + create.”

5. Finally, click Create to deploy the firewall. 

Step 2 of 7: Create a Default Route

After creating an Azure firewall, you must ensure that outgoing and incoming traffic goes through it. To achieve this, you must create a default route to 0.0.0.0/0, using the virtual appliance (the Azure firewall’s) private IP as a next hop.

In this subsection, you create an Azure route table and associate it with VNet’s workload subnet. 

1. Search Route tables on the Azure portal and select it. 

2. Then, on the top left of the Route tables page, “click + Create.” After that, enter the required information to create the new route table and click “Review + create.” 

Create the route table on the resource group you used for all othe resources. 

3. Finally, click Create to deploy the route table. 

4. After the deployment completes, choose “Go to resource.”

5. Once the route table opens, select Subnets. After that, choose “+ Associate,” and choose the Virtual Network you’re using for this lab. 

Finally, select the workload subnet, InfraSOS-WL-SN, and click OK. The firewall won’t work as expected if you do not select the workload subnet. 

6. Next, click Routes, then “+ Add.” Then, on the “Add route” flyout, select the options in the screenshot and click “Add.” 

The “Next hop address” is the private IP address of your Azure Firewall. If you did not note this earlier, open the Overview page of the firewall – see the second screenshot for details. 

Step 3 of 7: Configure a Firewall Application Rule to Allow Access to Google.com

1. Open the Azure firewall. If you’re using the names we use in this guide, the firewall name is InfraSOS-FW01.
2. After opening the firewall, under Settings, select Rules (classic). Click Application rule collection tab and select “+  Add application rule collection.”

3. Finally, on the “Add application rule collection” pop-out, enter the values in the screenshot below and click “Add.”

To make it easy for you to copy and paste, here are the details:

a) Application rule collection name: InfraSOS-App-Coll01
b) Priority: 200
c) Action: Allow
Under Target FQDNs –
d) name: Allow-Google
e) Source type: IP address
f) Source: 10.0.2.0/24 (this is the workload subnet)
g) Protocol:port: http, https.
i) Target FQDNS: www.google.com

While Azure is deploying the rule, proceed to step 4 of 7. 

Step 4 of 7: Configure a Network Firewall Rule to Allow Access to External DNS Servers

One of the requirements of this lab is to allow access to external DNS servers. Follow these steps to allow outbound access to DNS (port 53) to 2 public DNS IP addresses. 

1.  Click the Network rule collection tab. Select “+ Add network rule collection.”

2. Once the “Add network rule collection” pop-out opens, enter the following details – see the screenshot below for additional details:

a) Network rule collection name: InfraSOS-Net-Coll01
b) Priority: 200
c) Action: Allow
Under Rules –
d) name: Allow-DNS
e) Protocol: UDP
f) Source type: IP address
g) Source: 10.0.2.0/24 (this is the workload subnet)
h) Destination type: IP address 
i) Destination address: 209.244.0.3,209.244.0.4  (these are public DNS IP addresses operated by level3 – to confirm, run nslookup <IP address>. 
j) Destination Ports: 53 

When you finish, click “Add.”

While the deployment is progressing, proceed to step 5 of 7. 

Step 5 of 7: Configure a DNAT Rule to Allow RDP Access

The instruction to create this lab’s Windows Server 2019 VM included removing RDP access. Therefore, we use these steps to create a NAT rule to allow inbound RDP access to our Windows Server 2019 VM.

1. Select the NAT rule collection tab. Then, click “+ Add NAT rule collection.”

2. Then, enter the following values:

a) NAT rule collection name: rdp
b) Priority: 200
Under Rules:
c) name: rdp-nat
d) Protocol: TCP
e) Source type: IP address
f) Source: *  (this allows all IP addresses inbound RDP access. For production environments, you may want to allow specific IP addresses)
g) Destination address: the public IP address of your Azure firewall – see the second screenshot below if you need help finding it
h) Destination Ports: 3389 (this is the RDP port)
i) Translated address: the public IP address of the Windows Server 2019 VM’s network interface – see the 3 screenshot for steps to get the information
j) Translated port: 3389

Step 6 of 7: Configure Custom DNS for the Azure VM's Network Interfaces

By default, Azure VNets and network interfaces use Azure DNS for name resolution. In the following steps, we configure the network interface of our Windows Server 2019 Azure VM to use 2 external DNS servers for name resolution. 

1. Open the VM and click the Networking in the Settings menu. After, select the network interface of your Azure VM. 

2. Following, select DNS Servers in the Settings menu. Choose Custom

Next, enter the IP address of the DNS servers we allowed firewall access – 209.244.0.3, 209.244.0.4. When done, click Save. 

Wait for Azure to save the DNS configuration before proceeding to the next step. 

3. After the changes to the VMs network interface has saved successfully, open the VM and restart it from the Overview tab. 

Wait for the VM to restart, then proceed to step 7 of 7. 

Step 7 of 7: Test the Azure Firewall Deployment

The test intend to carry out confirms that the firewall we setup performs the following:

a) allows RDP to the Windows Server 2019 VM
b) We open google.com from the VM but not any other site. 
c) Our VM is using the custom DNS serves to perform name resolution. If we successfully open a website from the VM, this indicates that our VM uses the custom DNS for name resolution. 

Follow the steps below to RDP to the VM and complete the test.

1. Click Connect on the VMs Settings menu. After that, beneath the “Native RDP” click Select.  

2. Then, read the information on the “Native RDP” flyout and click Download RDP file. 

3. Once the RDP file downloads, double-click to open it. The RDP client requires confirmation that you wish to continue. 

Check the checkbox, “Don’t ask me again for connections to this computer,” then click Connect. 

4. Once the VM opens, log in with the username and password. Then, open google.com on a browser, and you should be able to access the site. 

However, when you open another site like dell.com, it should not work. 

Remember to delete the Azure resource group you used for this lab. When you delete the resource group, all resources in the resource group are deleted. 

Secure Azure Network with Azure Firewall & Security Groups Conclusion

Organizations must approach Azure network security from multiple fronts, starting with identity protection. Beyond identity protection, Azure tenants must be protected with firewalls, distributed denial of service (DDoS) services, and proactive monitoring

Fortunately, Azure offers all these security features. However, in this article, we focussed on securing Azure workloads with two of its firewall offerings – Azure Firewall and Network Security Groups (NSGs). 

We started by comparing Azure NSG with its firewall offerings. The article noted that NSGs are firewalls with basic traffic filtering. 

On the contrary, Azure firewall is a stateful Firewall as a Service (FaaS) that actively monitors the Azure workloads it protects and intelligently determines which traffic to allow or deny. 

The article also included hands-on labs demonstrating how to implement Azure firewall and Network Security Groups. 

By implementing the labs, we highlighted the core differences between the two Azure firewalls, and we’re confident that you found the hands-on guide helpful. 

InfraSOS-AD-Tools

Try InfraSOS for FREE

Try InfraSOS Active Directory, Azure AD & Office 365 Reporting & Auditing Tool

Victor Ashiedu

Victor Ashiedu

Victor is an IT pro based in Manchester, UK. With over 22 years of experience managing Windows Server, Active Directory, and Powershell, and 7 years of expertise in Azure AD and Office 365, he's a seasoned expert in his field. When he's not working, he loves spending time with his family - a wife and a 5-year-old. Victor is passionate about helping businesses succeed in today's fast-changing tech landscape.

Leave a comment

Your email address will not be published. Required fields are marked *