Install and Configure DNS Server on Windows Server. Surely, to install Domain Name System (DNS) on Windows Server is straightforward. Still, it is essential to understand DNS and how it works to set up a robust and effective DNS infrastructure. That includes installing DNS and creating and managing our first DNS records.
We know the Domain Name System and what it does, but we need to know how to install and configure DNS. For this article, we use the Windows Server 2012R2 DNS install process, which we also use for later builds like Windows Server 2016, 2019, and 2022.
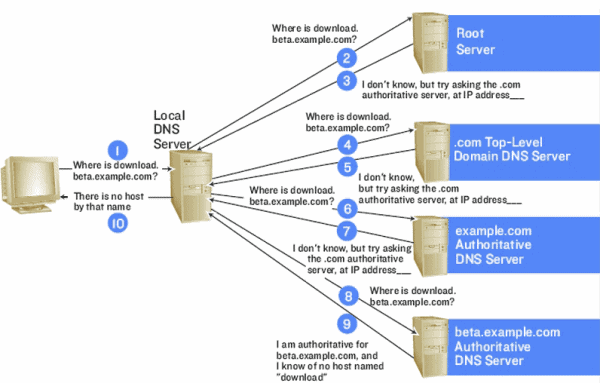
All in all, a Domain Name is a human readable version of an IP address. Well, an IP Address is what every computer on the internet uses to address itself when communicating with other computers via the TCP/IP network protocol. IP (v4) addresses, for example, look like a series of numbers and decimal points, such as 192.168.1.12.
When users enter a domain name, such as www.infrasos.com, their browser communicates with a network of root domain name servers, which act as a reference book, providing the IP address associated with that domain name. The browser then communicates directly with the hosting server using that IP address.
Altogether, DNS serves as a go between, translating user requests into IP addresses. Without DNS, users need to memorize and enter long IP addresses when connecting to other websites, rather than simply typing in the website’s name.
Basically, installing the DNS Server Role in Windows Server is a simple process that allows you to configure and manage a DNS server for your network. It involves adding the DNS server role to your Windows Server machine, configuring basic DNS settings, and creating and managing DNS records. First of all, log in as an administrator user to the Windows Server and follow the steps below to install the DNS server on our Windows Server:
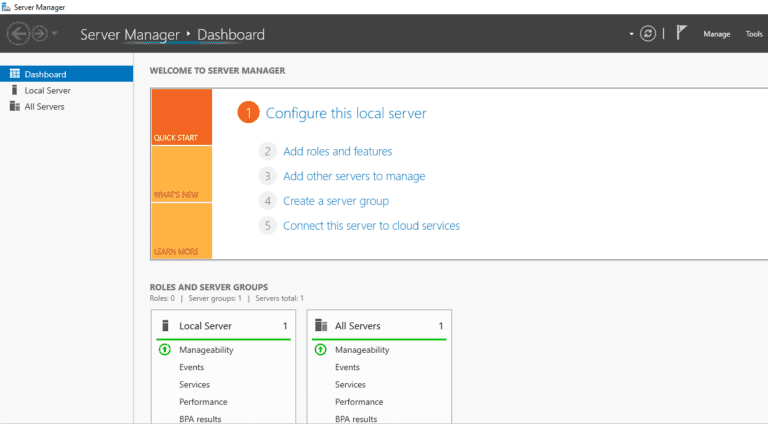
Step 1: Launch the Server Manager, as illustrated below:
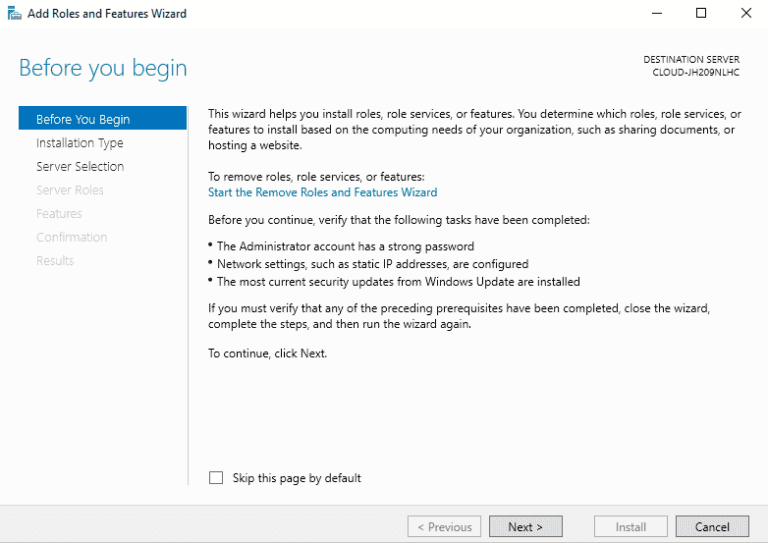
Step 2: Select Add roles and features.
Step 3: Press Next.
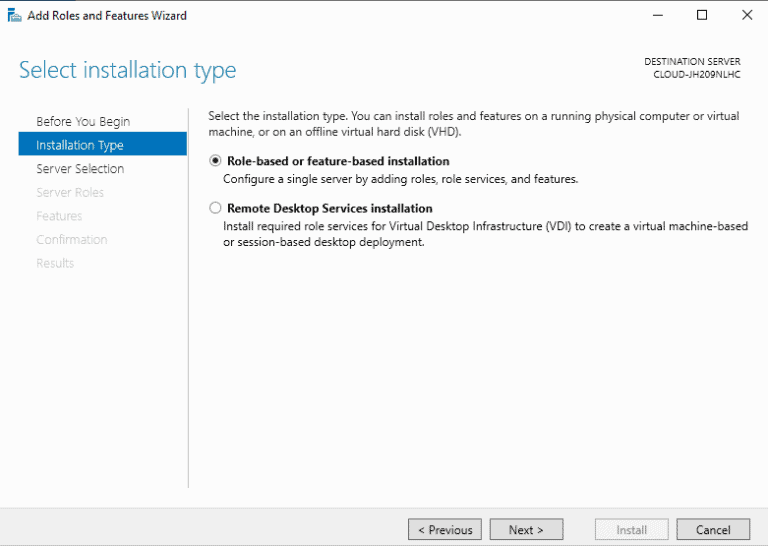
Step 4: Click on Next after selecting Role based and feature based installation.
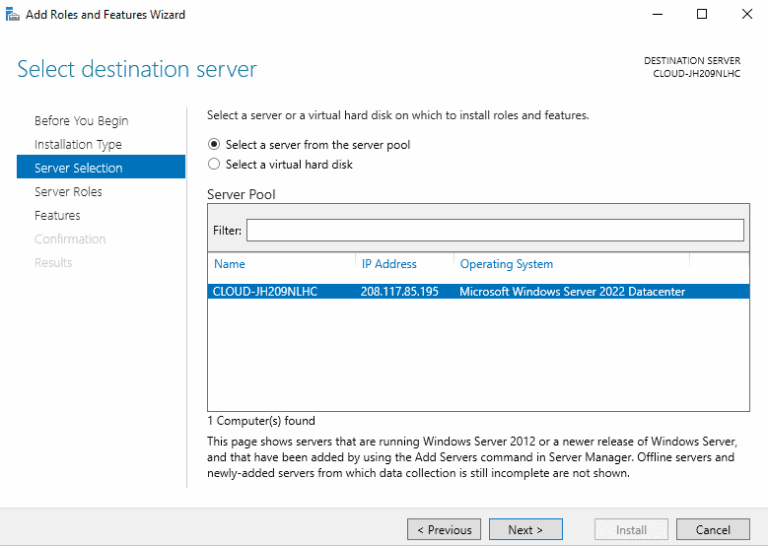
Step 5: Choose a server from the pool and press Next.
Step 6: Pick the DNS server and click Next.
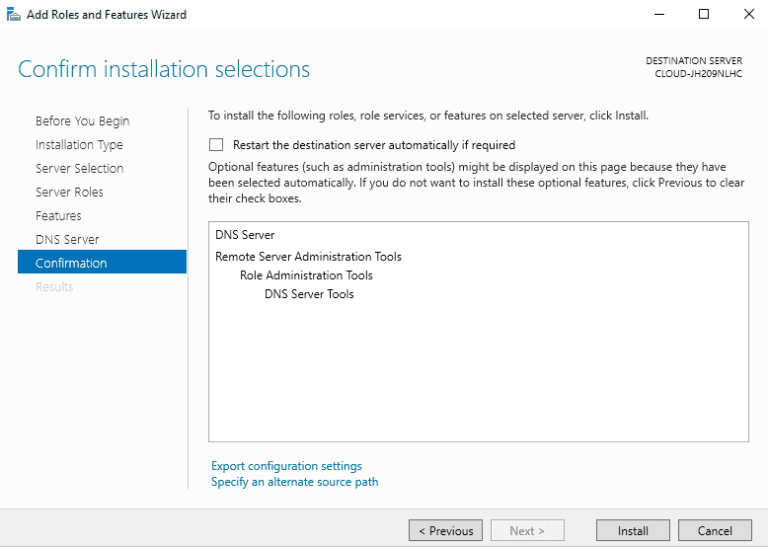
Step 7: Double check all settings before clicking the Install button to begin the installation.
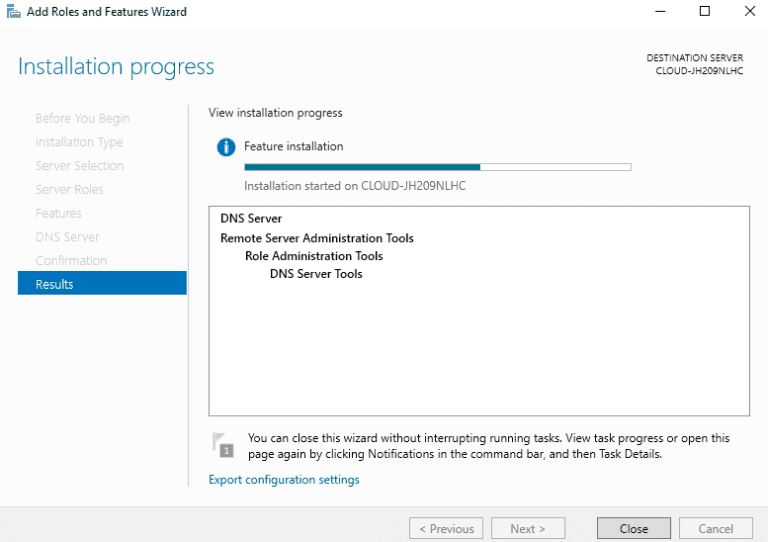
Step 8: Allow some time for the installation to complete. Once done, click the Close to exit the installation wizard.
Using PowerShell, we automate the installation process, making it easier and more efficient to set up a DNS server for your network. Here are the steps to install the DNS Server Role using PowerShell on Windows Server:
Step 1: Open Windows PowerShell as an admin by pressing the Windows key + X and selecting Windows PowerShell (Admin) from the menu. Step 2: Use the Install-WindowsFeature command to install the DNS Server Role:
Install-WindowsFeature -Name DNS -IncludeManagementTools
Step 3: Press Enter to run the command. You see a message indicating that the installation process has started. Step 4: Wait for the installation process to complete, which may take several minutes. Step 5: After the installation is complete, use the Get-WindowsFeature command to confirm that the DNS Server Role has been installed:
Get-WindowsFeature -Name DNS
Step 6: You should see a message indicating that the DNS Server Role is installed, and the display name should be DNS Server.
As a result, using PowerShell to install the DNS Server Role saves time and effort compared to manually installing the role through the graphical user interface. Additionally, using PowerShell allows us to automate the installation process, making it easier to set up multiple DNS servers consistently and repeatedly.
In this part of the article about how to Install and Configure DNS Server on Windows Server we are configuring DNS server first.
Active Directory & Azure AD User Reporting Tools by InfraSOS
Try us out for Free, Access to all features. – 200+ AD Report templates Available. Easily customise your own AD reports.
Configuring the DNS Server
Now, that we have set up the DNS server role, we can use the DNS service inside the server. We need to create forward and reverse lookup zones to resolve the name to IP address and vice versa.
Configuring the Forward Lookup Zone
Evidently, a Forward Lookup Zone in DNS is a database of resource records that map domain names to IP addresses. Hence, we use it to resolve host names to IP addresses.
Certainly, the Forward Lookup Zone is vital because it enables clients to access network resources using domain names instead of IP addresses. This lookup zone makes it easier for users to remember and access network resources, and it helps improve the network’s readability and maintainability.
Steps
In order to create a forward lookup zone, follow the steps below:
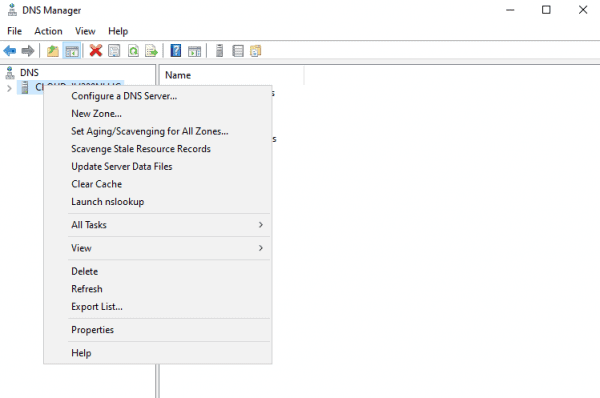
Step 1: On the server manager, navigate to Tools > DNS to access the DNS manager, as shown below:
Step 2: Right click on the server name and select Properties.
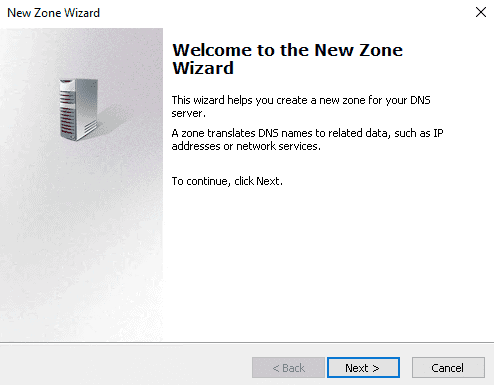
Step 3: Select the New Zone option.
Step 4: Press Next.
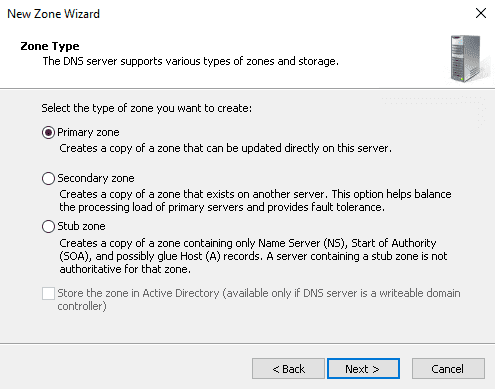
Step 5: Choose the Primary zone and press Next.
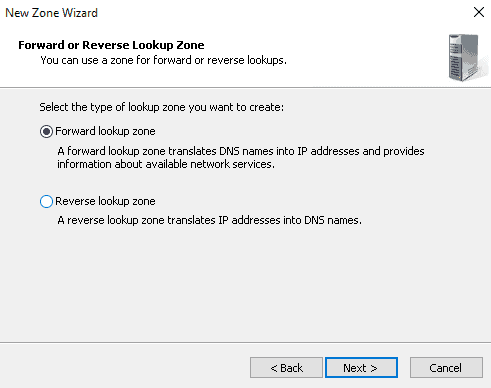
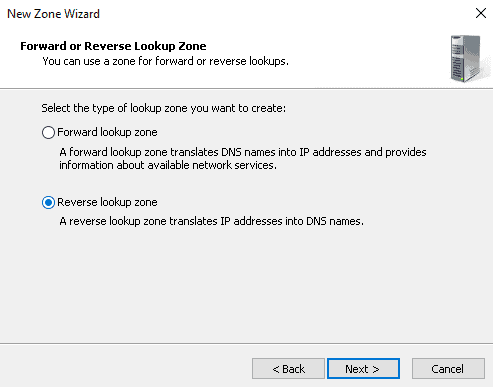
Step 6: Click Next after selecting the Forward lookup zone.
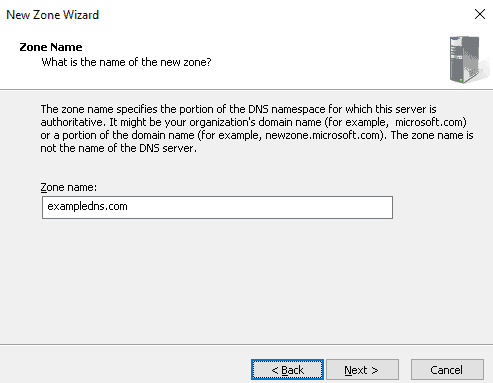
Step 7: Enter the name of our zone and press Next.
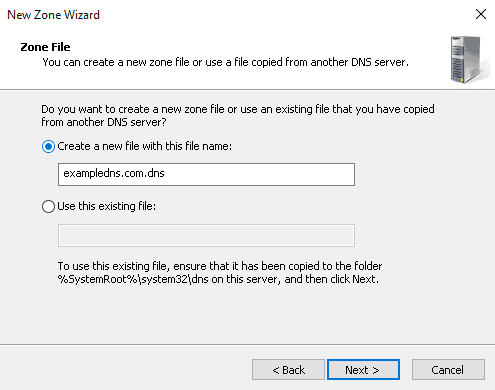
Step 8: Choose “Create a file with the file name” and press Next.
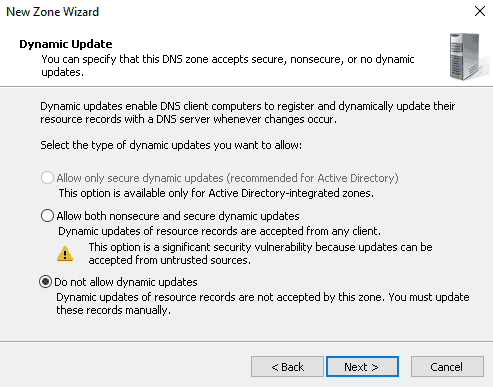
Step 9: Check the box next to “Do not allow dynamic update” and click Next.
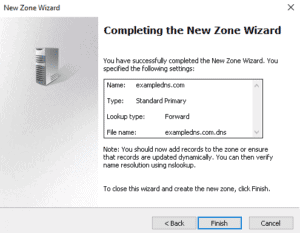
Step 10: Press the Finish button.
Next, with Install and Configure DNS Server on Windows Server we configure Reverse Lookup Zone.
Following, a Reverse Lookup Zone in DNS is a database of resource records that map IP addresses to host names. By all means, we use this lookup zone to resolve IP addresses to hostnames.
Further, a Reverse Lookup Zone is different from the Forward Lookup Zone. In that it maps IP addresses to host names, while the Forward Lookup Zone maps host names to IP addresses. Additionally, the Reverse Lookup Zone is typically less frequently used than the Forward Lookup Zone, as clients are more likely to access network resources using host names rather than IP addresses.
Steps
Indeed, to create a forward lookup zone, follow the steps below:
Step 1: On the server manager, navigate to Tools > DNS to access the DNS manager:
Step 2: Right click on the server name and select Properties.
Step 3: Here, select the New Zone option.
Step 4: Press Next.
Step 5: Now, choose the Primary zone and press Next.
Step 6: From this step forward, the setup is different from our previous section. Next, click Next after selecting the Reverse lookup zone.
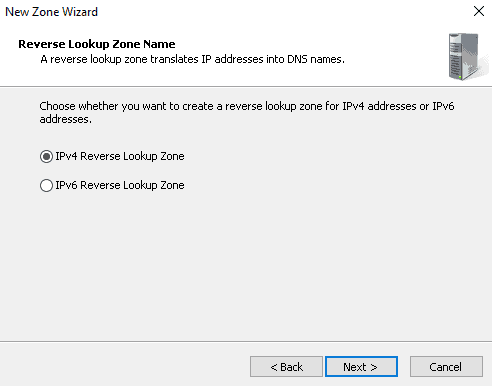
Step 7: After, select IPv4 Reverse Lookup Zone and click on Next.
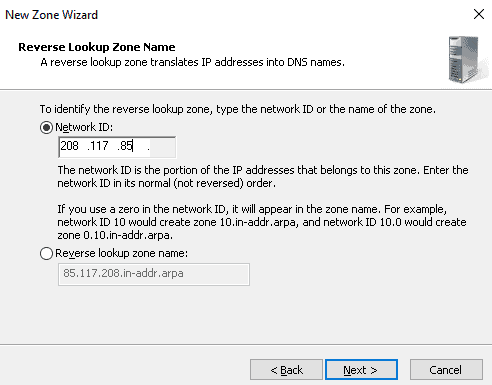
Step 8: Define your network ID and click Next.
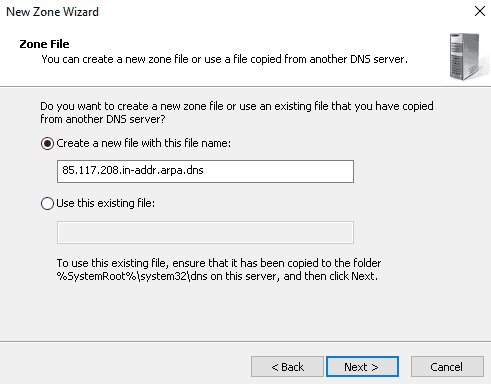
Step 9: Further, choose “Create a file with the file name” and press Next.
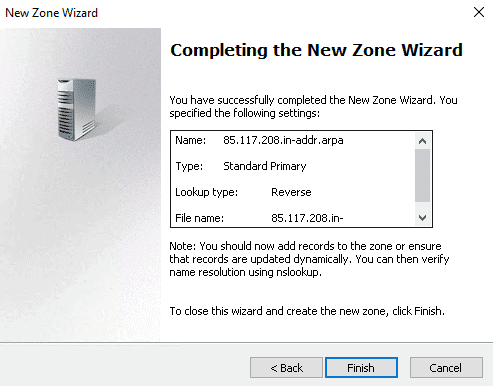
Step 9: Please check the box next to “Do not allow dynamic update” and click Next.
Moreover, DNS records are essential for several reasons:
Domain name resolution: In short, we use DNS records to map domain names to IP addresses, allowing clients to access network resources using human readable names rather than IP addresses.
Network functionality: Properly configured DNS records are critical for ensuring network services and applications function correctly.
Network security: In similar fashion, we use DNS records to secure our network by providing information about which IP addresses correspond to our domain names. We use this information to block malicious traffic and improve network security.
Load balancing: By creating multiple A records for the same hostname and assigning different IP addresses to each record, we distribute incoming traffic across multiple servers, improving the performance and reliability of our network.
Management and administration: In this case, DNS records are managed and updated centrally, making organizing and maintaining our network easier.
Overall, DNS records are a fundamental part of the functioning of the internet and are critical for ensuring that domain names are resolved to IP addresses. That network services and applications work correctly and that networks are secure and reliable.
Steps
Please follow the below steps to add A and PTR records to DNS:
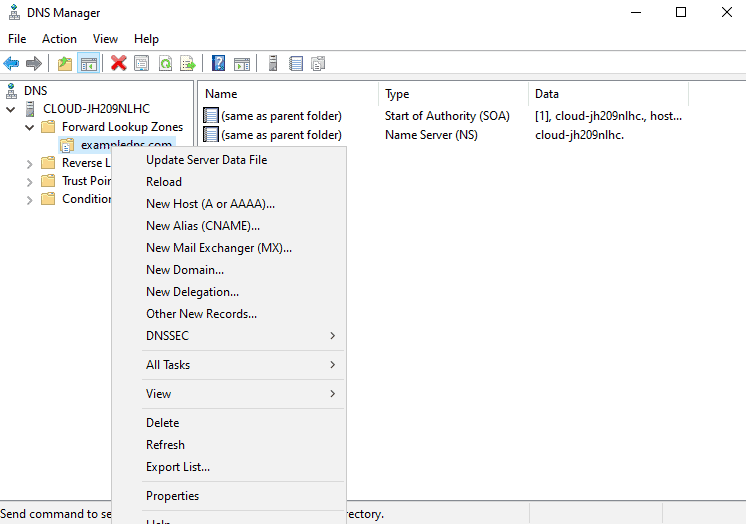
Step 1 : On the DNS manager, right click on the forward lookup zone.
Step 2: Click on the NewHost (A or AAAA).
Step 3: Provide the host’s parent domain name and IP address, select “Create associated pointer record” and then click on the Add Host button.
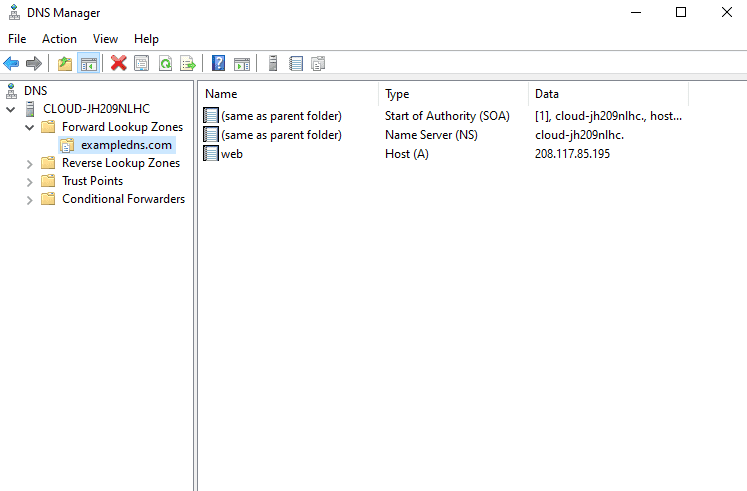
When creating a zone in Windows Server DNS, the Start of Authority (SOA) and Name Server (NS) records are automatically created for several reasons:
Start of Authority (SOA) Record: The SOA record defines the start of a DNS zone and provides information about the zone itself. This record is required for all zones and is used to identify the authoritative source of information for the zone. In addition, the SOA record contains essential information, such as the primary DNS server for the zone, the email address of the person responsible for the zone, and the refresh and retry intervals for the zone.
Name Server (NS) Record: The NS record identifies the authoritative DNS servers for a particular zone. These servers serve DNS information for the zone and resolve DNS queries for the domain. The NS record is also used to delegate subdomains to other DNS servers.
Given that, the process is streamlined and simplified by automatically creating the SOA and NS records when creating a zone in Windows Server DNS, ensuring that the required information for the zone is present and accurate. Particularly, this helps to ensure that the zone functions correctly and that the network resolves DNS queries for the domain.
In the above example, we created A (forward lookup) and PTR (reverse lookup) records. However, these are only some records available when managing the DNS. Here are some examples below:
Type of Record
Definition
Example
A (Address)
Example, that maps a host name to an IPv4 address
www.example.com A 192.168.1.100
AAAA (IPv6 Address)
Another, that maps a host name to an IPv6 address
www.example.com AAAA 2001:db8:0:1234::1
MX (Mail Exchange)
Specifies the mail servers responsible for a specific domain name
example.com MX mail.example.com
CNAME (Canonical Name)
Following example, that maps an alias to a true or canonical domain name
www.example.com CNAME example.com
NS (Name Server)
Specifies the name servers for a specific domain name
example.com NS ns1.example.com ns2.example.com
PTR (Pointer)
Here, it maps an IPv4 or IPv6 address to a host name (reverse DNS lookup)
100.168.192.in-addr.arpa PTR www.example.com
SRV (Service)
Similarly, it specifies the host and port for a specific service for a domain name
Stores text-based information such as SPF records, email routing information, or other information
example.com TXT “v=spf1 mx a:example.com ~all”
Note: This table lists the most common types of DNS records, but many other types are available. In detail, the specific records we need depends on our network’s requirements and the services we want to provide.
Install and Configure DNS Server on Windows Server Conclusion
In conclusion, installing and configuring DNS on Windows Server is critical for any organization that wants to provide reliable and secure domain name resolution services. Finally, DNS is a critical component of the internet. Therefore, it is vital to ensure that we resolve domain names to IP addresses, that network services and applications work correctly, and that networks are secure and reliable.
By configuring DNS in Windows Server, we improve the management and administration of our network, as well as provide enhanced security and reliability. Installing and configuring DNS in Windows Server is straightforward. We use the graphical user interface or the command line to configure DNS servers and create and manage DNS records.
Fell free to explore more about the Active Directory content by navigating here.
Windows Server and VMware SME. Powershell Guru. Currently working with Fortune 500 companies responsible for participating in 3rd level systems support across the enterprise. Acting as a Windows Server engineer and VMware Specialist.