Configure and Manage Windows Firewall for Your Windows Server. In the realm of robust server management, the Windows Firewall emerges as a pivotal apparatus, unwaveringly shielding our Windows Server against diverse potential vulnerabilities, all while facilitating precise regulation of communication streams. As an elemental constituent of the Windows Server operating system, adeptly configuring and proficiently managing the Windows Firewall necessitates a nuanced comprehension of its functionalities. This article undertakes meticulous and exhaustive scrutiny of the multifaceted facets underpinning the configuration and management of the Windows Firewall within our Windows Server environment, furnishing invaluable discernments to fortify our server’s fortifications and fine-tune its operational efficiencies.
Configure and Manage Windows Firewall for Your Windows Server
Windows Firewall is a built-in security feature in the Windows operating system that acts as a barrier between a computer or network and potential threats from the internet or local network. It monitors and controls incoming and outgoing network traffic, helping to protect the system from unauthorized access and malicious activity. The next section of the article tells us more on how to turn off the Windows firewall.
Configuring Windows Firewall Using the GUI
Windows’s built-in graphical user interface (GUI) tools are the quickest way to manage the firewall for home and work users. One example of a GUI tool is the Windows Defender Firewall Control panel.
Using the Windows Defender Firewall Control Panel
The Windows Defender Firewall Control Panel, an integral facet of the Windows operating system, empowers users to orchestrate a robust line of defence for their systems. Through this accessible interface, users meticulously govern inbound and outbound traffic, fortifying their network security while maintaining seamless communication integrity. Below are several ways to launch the Windows Defender Firewall Control Panel:
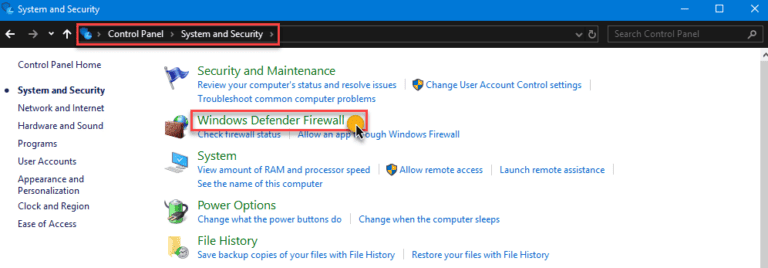
Method 1
Navigate to Control Panel → System and Security → Windows Defender Firewall.
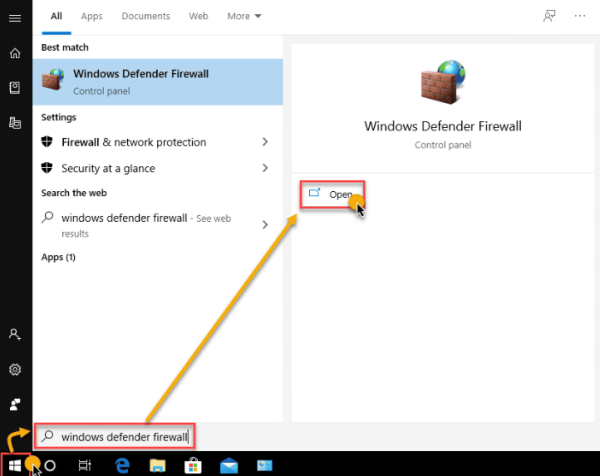
Method 2
Click on Start and type Windows Defender Firewall. Click on the Windows Defender Firewall link.
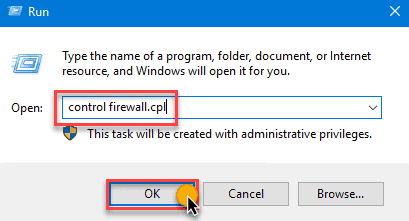
Method 3
Open the Run dialog box, type in firewall.cpl, and click OK.
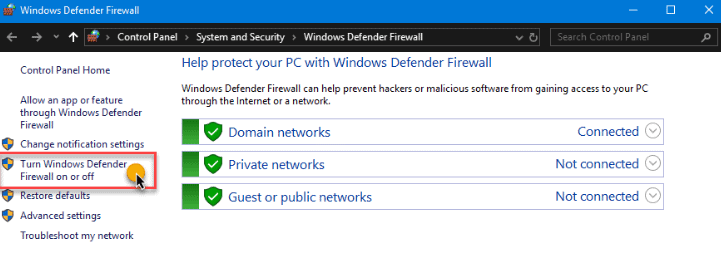
We should recognize the list of network profiles—Domain, Private, and Guest or public networks in the Windows Defender Firewall Control Panel. Click the Turn Windows Defender on or off link on the left-hand side.
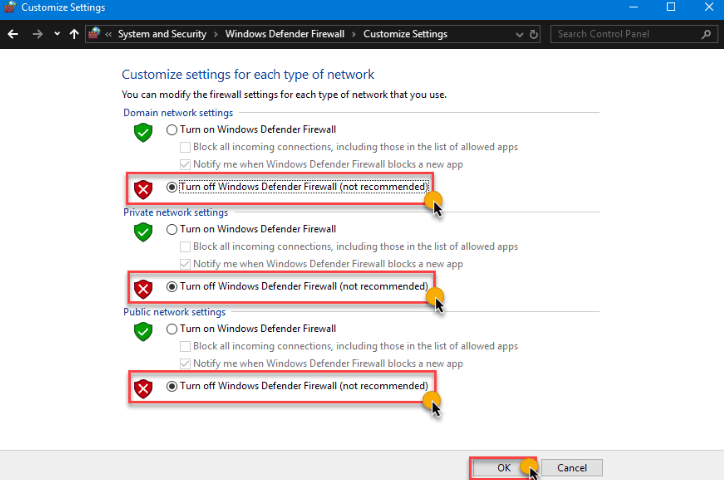
We turn off the Windows firewall for each network profile on the Customize Settings page. The Windows Firewall is disabled on all network profiles in the example below.
Using the Group Policy Management Console
By deploying a group policy object (GPO), systems administrators turn off the Windows Firewall for selected or all computers in the domain. Once deployed, disabling Windows Firewall is automated as the configuration enforces it via policy on all computers in scope.
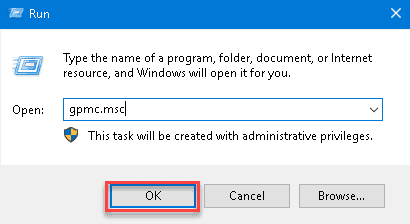
In this case, we are using the Group Policy Management Console (GPMC) on the server to create a GPO. To do so, run the gpmc.msc command in the Run dialog.
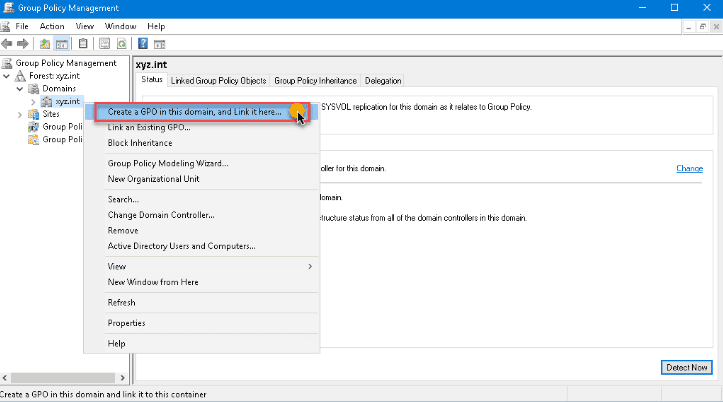
Expand the forest in the Group Policy Management console and select the domain where we create the GPO. Once we have created the GPO in the domain right-click on it, and click Create a GPO in this domain, and Link it here…
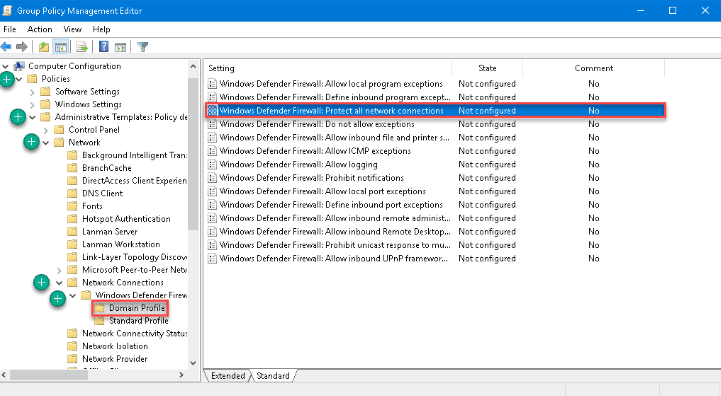
The New GPO dialog box pops up. Type a name for the GPO that we create. Right click the new GPO and then select Edit. The GPO opens in the Group Policy Management Editor. Then, expand these folders:
- Computer Configuration
- Policies
- Administrative Templates
- Network
- Network Connections
- Windows Defender
- Firewall
- Domain Profile
Here we see the list of all Windows Firewall profiles that we implement in our domain. For this example, in the settings list on the right pane, double-click on Windows Defender Firewall: Protect all network connections to open its properties.
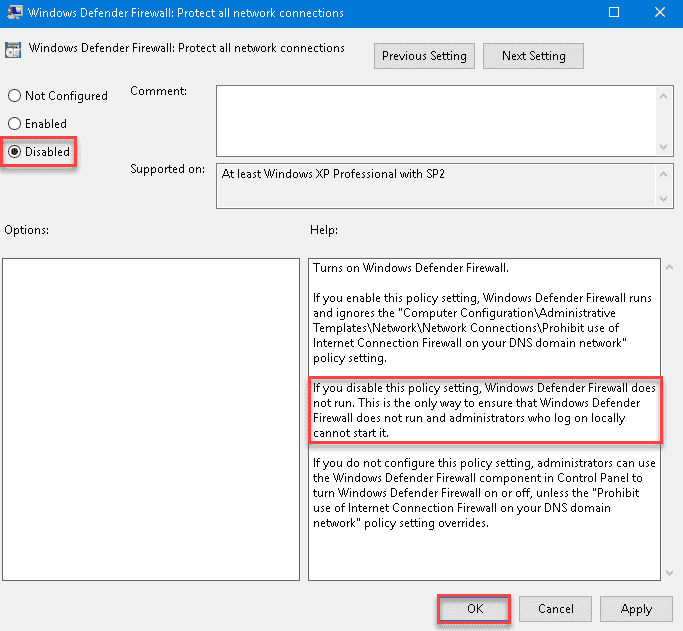
Once the settings property is open, change the value by selecting Disabled, then click OK.
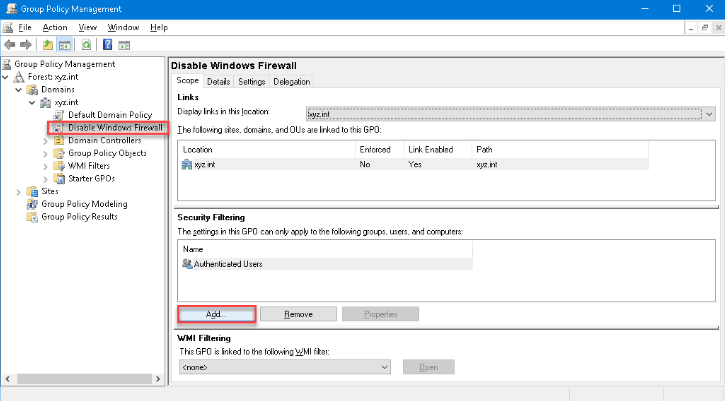
Apply the same option once more to the settings for the Standard Profile. Now that we have created the GPO, we need to deploy the GPO to the domain computers. Select the Disable Windows Firewall GPO in the Group Policy Management to apply the GPO. Then, click the Add button under the Security Filtering section in the Scope tab.
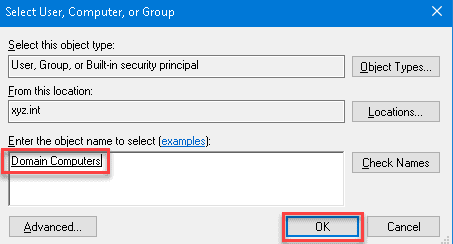
Look for Domain Computers in the Select User, Computer, or Group dialog box, then click OK. Doing so ensures that we apply a GPO to all computers that are members of the Domain Computers group.
The system turns off the firewall the next time the client computers get the policy update.
Now that the GPO has been created and deployed, we test whether the GPO is working by forcing a policy update. Run the gpupdate /force on the client computer to test the policy update.
Try our Active Directory & Office 365 Reporting & Auditing Tools
Try us out for Free. 100’s of report templates available. Easily customise your own reports on AD, Azure AD & Office 355.
Configuring Windows Firewall Using the CLI
Most, if not all, of Windows GUI functions have command-line equivalents. Using the command line interface (CLI) is sometimes quicker than going to different Windows locations using the GUI options. Additionally, the command-line options enable users to script or automate the task. Here are some examples:
Managing Windows Firewall with the Netsh Command
A legacy but valuable handy utility called netsh is useful to manage network configurations on a computer or, in this case, disable the Windows Firewall. Using netsh advfirewall set, we manage Windows Firewall individually on each location or all network profiles.
- netsh advfirewall set currentprofile state – this command manages the presently active network profile firewall.
- netsh advfirewall set domainprofile state – manages the firewall on the Domain network profile only.
- netsh advfirewall set privateprofile state – manages the firewall on the Private network profile only.
- netsh advfirewall set publicprofile state – this command will only manage the firewall on the Public network profile.
- netsh advfirewall set all profiles state – this command will manage all network profiles simultaneously.
Integrating netsh commands increases the opportunity for exact firewall configuration and management for experienced users seeking granular control, ultimately bolstering the server’s resistance to changing cyber threats.
Using the Set-NetFirewallProfile PowerShell Cmdlet
The NetSecurity PowerShell module contains cmdlets related to network and network security configuration. The said PowerShell module is built-in to Windows Server 2012 and above. One of these cmdlets is the Set-NetFirewallProfile, which we use to manage Windows Firewall.
					Set-NetFirewallProfile -All -Enabled True
Set-NetFirewallProfile -Profile  -Enabled False
The command below turns off the firewall on the Public, Private, and Domain network profiles:
Set-NetFirewallProfile -Profile Domain,Private,Public -Enabled False
Without specifying any profile names, the example below shows how to disable Windows Firewall on all network profiles by using the –All parameter switch.
Managing Windows Firewall Remotely Using PowerShell
When we need to manage firewalls on many computers, it is inefficient to log into each computer and run the commands manually. Especially in a network environment, we disable remotely using PowerShell.
Note: This procedure requires us to enable Windows Remote Management or WinRM on the target computer. In most cases, WinRM is available for domain-joined computers for remote management purposes.
If we plan to disable Windows Firewall on one remote computer at a time, we use the Enter-PsSession cmdlet to issue the commands to the remote computer.
					Enter-PsSession -ComputerName WINSRV01
Set-NetFirewallProfile -All -Enabled False
The above process is good only if we work on a few remote computers. But, if we have many computers where we need to turn them off, we need an approach more adapted to scripting. For that, we use the Invoke-Command cmdlet.
					$computers = @('WINSRV01','WINSRV02')
$computers | ForEach-Object {
	Invoke-Command -ComputerName $_ {
		Set-NetFirewallProfile -All -Enabled False
	}
}
As we see from the above snippet, we store the remote computers’ names in the $computers variable as an array. Then, PowerShell loops through each remote computer to run the Invoke-Command cmdlet and issue the Set-NetFirewallProfile -All -Enabled False command.
Windows Firewall with Advanced Security
The distinction between Windows Firewall and Windows Firewall with Advanced Security lies in their complexity and capabilities. Windows Firewall functions as a primary, user-friendly firewall by regulating incoming and outgoing network traffic using predefined rules, while Windows Firewall with Advanced Security provides advanced users and administrators with a more intricate toolset, enabling highly customized configurations encompassing criteria such as IP addresses, protocols, users, and services, making it particularly suitable for complex network environments.
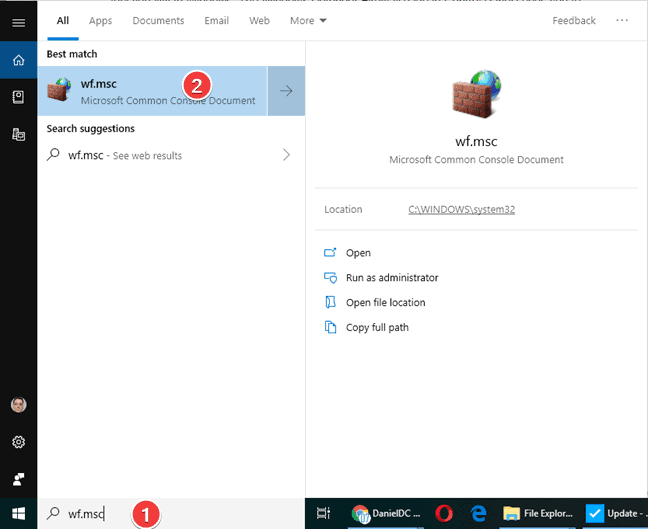
In all three Windows versions, looking for the executable file for Windows Defender Firewall with Advanced Security is the simplest way to launch it. Click or press on the result after typing wf.msc into the Windows search box.
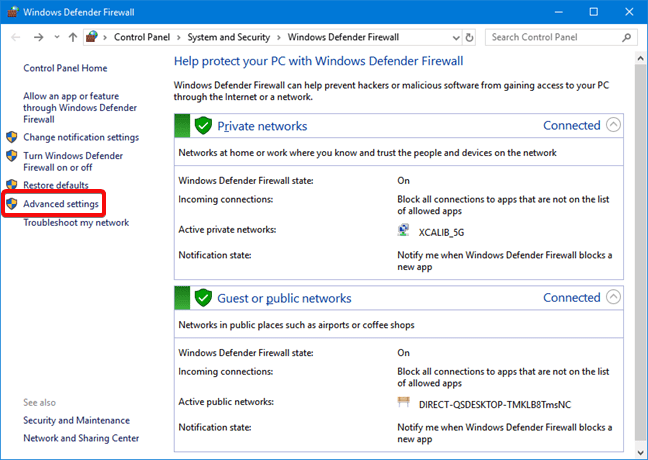
In the Control Panel, we access the Windows Defender Firewall with Advanced Security by clicking System and Security -> Windows Defender Firewall and clicking or tapping Advanced settings.
Within the Windows operating system, a shortcut to access Windows Defender Firewall with Advanced Security is conveniently located in the Start Menu by following this route: Start Menu → Windows Administrative Tools → Windows Defender Firewall with Advanced Security.
Advantages of Windows Firewall with Advanced Security
The tool grants us entry to all functionalities within the Windows Defender Firewall. Here are several advantages of its utilization:
- Diminishes the vulnerability to network-based security breaches. While not a comprehensive security solution, Windows Defender Firewall curtails the likelihood of a triumphant network assault.
- Verifies entry to our device, employing IPsec (Internet Protocol Security) to ensure data integrity and confidentiality.
- Furnishes firewall capabilities sans extra expenditures. As an integral component of Windows, Windows Defender Firewall provides firewall functionality without financial outlay or the need for additional software installation.
Windows Defender Firewall with Advanced Security confers these advantages through its featured mechanisms:
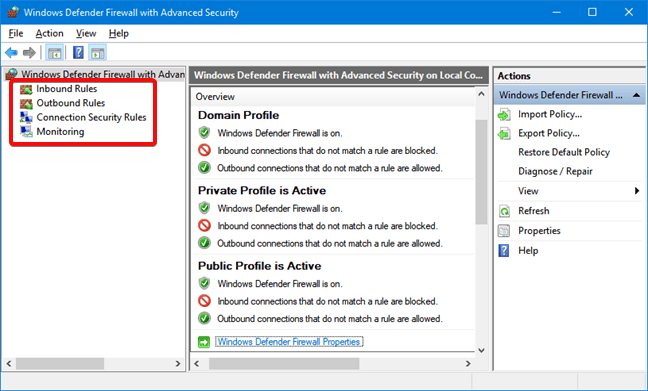
- Inbound and Outbound Rules: These rules enable precise control over incoming and outgoing network traffic, allowing customization based on port numbers, programs, and IP addresses.
- Connection Security Rules: By defining encryption parameters and authentication methods, these rules establish secure communication channels, enhancing network security.
- Monitoring: The firewall offers comprehensive monitoring tools that track events like rule matches and connection attempts, aiding in timely threat detection and response.
Thank you for reading how to Configure and Manage Windows Firewall for Your Windows Server. We shall conclude,
Configure and Manage Windows Firewall for Your Windows Server Conclusion
In conclusion, mastering the configuration and management of the Windows Firewall on our Windows Server is paramount in upholding a secure and optimally performing server environment. The Windows Defender Firewall Control Panel provides an accessible gateway to safeguarding communication integrity and thwarting potential vulnerabilities. Additionally, for those aiming for a heightened degree of control, integrating netsh commands offers an advanced avenue to fine-tune firewall settings, culminating in a comprehensive approach that fortifies our server’s defence against a dynamic digital landscape.
Try InfraSOS for FREE
Try InfraSOS Active Directory, Azure AD & Office 365 Reporting & Auditing Tool
- Free 15-Days Trial
- SaaS AD Reporting & Auditing Solution


