Managing Azure AD Roles and Permissions with PowerShell. Do you need help managing and automating Azure AD Roles and Permissions with Windows PowerShell? This article explains the typical scenarios for automating Azure Role Based Access Control (RBAC) using PowerShell.
To lay the foundation and prepare to manage Azure roles and permissions, we start with an overview of Azure role-based access control (RBAC). Following that, we explain the three elements of role assignment.
There is also a section that explains the prerequisites for managing Azure AD roles and permissions with Windows PowerShell.
The next sections are dedicated to explaining the steps for assigning Azure AD roles using PowerShell.
Finally, we explain how to list roles assigned to users and groups using PowerShell.
What is Azure Role-Based Access Control (RBAC)
Azure role based access control (RBAC) allows administrators to do fine grained access control to resources. In other words, Azure RBAC allows admins to control who has access to resources.
Additionally, RBAC controls the level of access to resources in Azure.
At the core of RBAC is role assignments. Azure has hundreds of built-in roles with pre-defined permissions that are assigned to users, groups, or service principals.
The existence of built-in roles with pre-defined permissions makes role assignments easy, as admins do not have to grant permissions to objects directly.
However, there are instances where the built-in roles may not be suitable for an organization’s needs. In this situation, custom roles are created.
This article covers the steps to assign existing roles and also create and assign custom Azure AD roles.
Azure Role Assignment Elements
Assigning role assignments involves 3 elements – security principal, role definition, and scope. The security principal is the Azure Active Directory object to be assigned the role.
On the other hand, the role definition is the built-in or custom Azure AD role that is being assigned while the scope is level the role is assigned. There are 4 scopes of that roles are assigned in Azure.
Specifically, Azure roles are assigned to a resource, a resource group, a subscription, and a management group. To assign a role to a resource, you require the resource ID.
However, assigning a role to a resource group scope requires the name of the resource group. Running the Get-AzResourceGroup command returns all resource groups, including their names in the current subscription.
If assigning a role at the subscription scope, you need the subscription ID. To list all subscriptions in the tenant, run the Get-AzSubscription command.
Finally, roles are assigned a management group scope which requires the name of the management group. To get the name of a management group, run the Get-AzManagementGroup command.
Understanding these elements is important to managing Azure AD roles and permissions with PowerShell. In the remaining part of the article, we explore how the security principal, role definition, and scope are used to assign and manage roles in Azure AD using PowerShell.
Try our Active Directory & Office 365 Reporting & Auditing Tools
Try us out for Free. 100’s of report templates available. Easily customise your own reports on AD, Azure AD & Office 355.
Prerequisites for Managing Azure AD Roles and Permissions with PowerShell
Before an admin assigns roles, they must meet the following requirements:
- The user must be assigned the roles with Microsoft.Authorization/roleAssignments/write permissions. Sole roles with this permission are User Access Administrator, Owner, or Global Administrator.
- Secondly, you require access to Azure Cloud Shell or Azure PowerShell.
- The user account running the PowerShell commands must have the the Microsoft Graph Directory.Read.All permission.
- Finally, to perform some of the tasks in this article, your account requires a minimum Azure AD Premium P1 license.
As we progress in this article, we explain the steps to assign these permissions as required.
Steps to Assign Built-in Azure AD Roles Using PowerShell
I’ll be running the PowerShell commands in this and subsequent sections from Azure Cloud Shell, a browser-based shell that allows running Azure CLI or PowerShell commands. However, I’ll be running the commands from my computer.
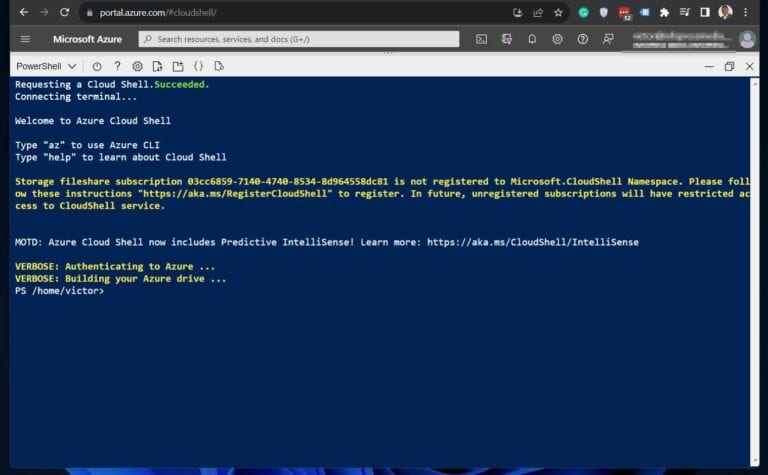
If you click the cloud shell link above and sign in with your Azure account, it displays a screen like the one in the screenshot below. The benefit of Azure Cloud Shell is that it does not require installing any PowerShell modules on your PC.
Step 1: Determine the Object ID
You need to get the object ID before assigning a role to an Azure resource. Follow these steps to determine the object ID for a user, group, or subscription.
1. Open the Azure Cloud Shell – shell.azure.com and sign in with your Azure account.
If you’re opening Azure Cloud Shell for the first time, it requires you to create a storage account.
2. Run the commands below to get the ID of the user or group you need to assign a role. In the first command, I an returning the ID of a user that begins with
					$userid = (Get-AzADUser -UserPrincipalName AnthonyRa@corp.itechguides.com).id
$groupid = (Get-AzADGroup -DisplayName "Helpdesk Admins (AAD)").id
The first command saves the ID of the user in the userid variable, while the second one saves the group ID of the group to the grouped variable. Before running the commands remember to change the UserPrincipalName and the DisplayName.
Step 2: Get the Role to Assign
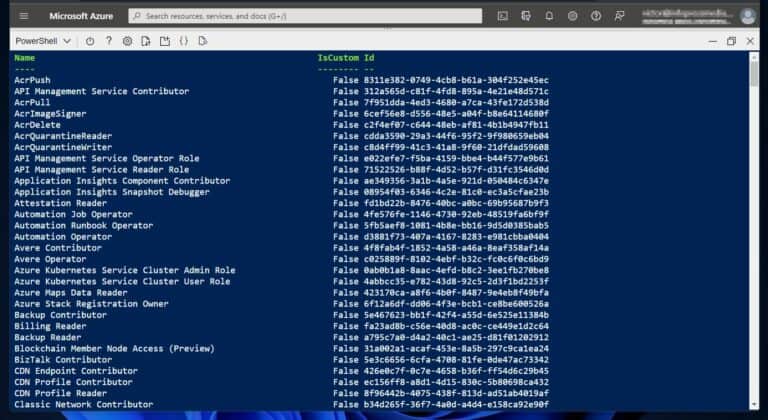
The next step for managing Azure AD roles and permissions with PowerShell is determining the role to assign. Start by listing all the available roles in your Azure AD tenant using the following command.
Get-AzRoleDefinition | Format-Table -Property Name, IsCustom, Id
The command displays the Name, and Id of all roles in the tenant. Additionally, it returns True or False in the IsCustom column.
To demonstrate, I want to assign the Security Admin role to the user and group I determined in Step 1. To display the name of the role, I pipe the output of the Get-AzRoleDefinition command to Where-Object as shown in this command.
$roleassignmentname = (Get-AzRoleDefinition | where-object {$_.name -eq "Security Admin"}).Name
Step 3: Identify the Role to Assignment Scope
The command below returns the ResourceID of a storage account (resource scope) and saves it in the ResourceID variable.
Later, I assign the user in step 1 the “Security Admin” role in this storage account resource.
$scoperesourceID = (Get-AzResource | Where-object {$_.name -eq "veeambackup21"}).ResourceID
Step 4: Assign the Azure Role
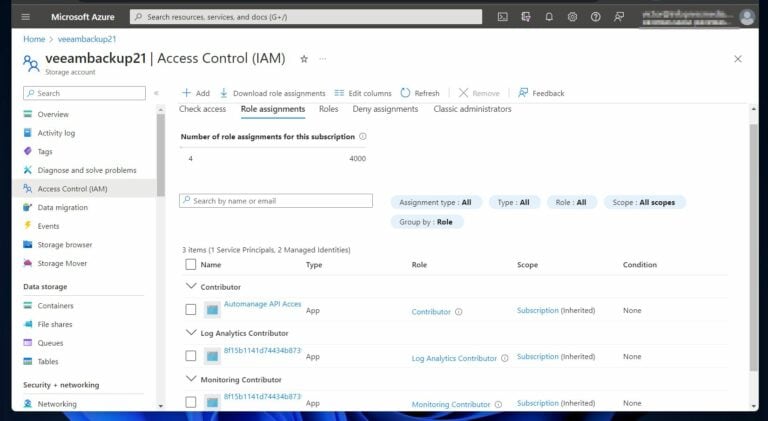
Using the information in steps 1 to 3, run the command below to assign the role to the user. Before running the command, the role is not assigned to this storage account, as shown in the screenshot below.
The first command assigns the “Security Admin” role to a user saved in the $userid variable. Similarly, the second command assigns the same role to a group saved in the $groupid variable.
					New-AzRoleAssignment -ObjectId $userid -RoleDefinitionName $roleassignmentname -Scope $scoperesourceID
New-AzRoleAssignment -ObjectId $groupid -RoleDefinitionName $roleassignmentname -Scope $scoperesourceID
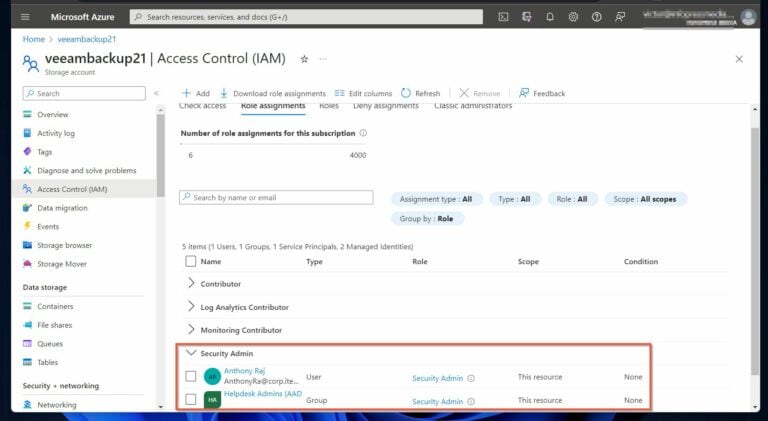
After running the above commands, refreshing the storage accounts displays the Security Admin role, and the user and group assigned the role.
Display Azure AD Role Assignment Using PowerShell
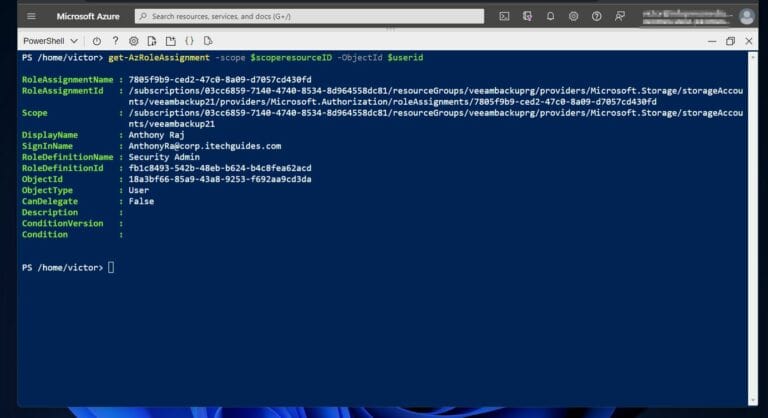
Earlier, I assigned the “Security admin” role to a user with UPN, AnthonyRa@corp.itechguides.com. If you recall, the userId for the user was saved in the $userid variable.
Similarly, the scope ID of the storage account was saved in the $scoperesourceID variable. To display the role assignment for the user, I run the command below.
get-AzRoleAssignment -scope $scoperesourceID -ObjectId $userid
The command displays the role assignment details, including the RoleAssignmentName, and scope.
get-AzRoleAssignment -scope $scoperesourceID -ObjectId $groupid
Managing Azure AD Roles and Permissions with PowerShell Conclusion
Administering Azure roles requires knowledge of the role based access control model. Additionally, understanding Azure role assignment elements – security principal, role definition, and scope – is essential to manage role assignments with PowerShell effectively.
Not only that, but an account assigning roles has to meet some prerequisites such as such as configuring PowerShell with the required modules and ensuring appropriate administrative privileges.
The step-by-step guide provided in this article offers a clear roadmap to follow when assigning built-in Azure AD roles using PowerShell. From determining the Object ID to identifying the scope for role assignment, each stage is meticulously outlined, facilitating a seamless and controlled role allocation process.
Try InfraSOS for FREE
Try InfraSOS Active Directory, Azure AD & Office 365 Reporting & Auditing Tool
- Free 15-Days Trial
- SaaS AD Reporting & Auditing Solution
Related posts:
- Azure AD Roles and Permissions: Assign & Manage Roles for Users & Groups
- Office 365 Identity & Access: Manage Users & Permissions
- Azure AD Custom Roles: Create & Manage Custom Roles for Azure AD
- Azure AD Privileged Roles: Manage & Monitor Privileged Access
- Azure Storage Security: Secure Accounts with Encryption & Access Policies


