How to Add Domain Controller to an Existing Domain. Having one Domain Controller (DC) is not recommended because it creates a single point of failure (SPOF) risk. For example, if the only Domain Controller goes down in the organization, extensive outages result in a loss of operations. Therefore, we need to have a secondary Domain Controller to avoid SPOF.
A second replicating DC loads balance the services and reduces the likelihood of critical services failing. In this article, we go over how to add a second DC to an existing domain.
How to Add Domain Controller to an Existing Domain
This article focuses mostly on the build process of Windows Server 2012R2. If we are using later versions such as Windows 2016, 2019, or 2022, the steps to adding a secondary DC are the same.
Importance of Having a Secondary Domain Controller
Having a secondary or replication domain controller in an Active Directory (AD) environment is crucial for ensuring the availability and reliability of our network. Here are a few reasons why:
Redundancy: A secondary domain controller provides a backup for our primary domain controller. If the primary domain controller fails, the secondary domain controller takes over, ensuring that our network remains up and running.
Load balancing: If we have an extensive network with many users, a secondary domain controller helps to distribute a load of authentication and authorization requests, improving performance and reducing the risk of the primary domain controller becoming overwhelmed.
Disaster recovery: In the event of a data center disaster, a secondary domain controller in another remote site ensures that our network remains functional, as it take over the role of the primary domain controller, if needed.
Improved security: A secondary domain controller in a remote location increases security. It provides an off-site backup that we use to restore our network in case of a security breach.
Faster replication: By replicating directory information between domain controllers, a secondary domain controller helps ensure that the DC reflects the changes made in one part of the network in real time throughout the entire network. This process helps prevent problems such as outdated user account information or inconsistent group policy settings.
All in all, having a secondary or replication domain controller in an AD DS environment provides an essential layer of redundancy. In addition, it helps ensure our network’s availability, reliability, and security.
Adding a secondary domain controller in our environment is straightforward. Follow the steps below to ensure proper configuration.
Step 1: Configure the Basic Server Settings
Before promoting the server to a secondary DC, we must configure the following settings:
Computer name – Before promoting it to a DC, we want to set the computer name.
IP Settings – Configure a static IP address on the DC and ensure that the DNS points to an existing domain controller or the DNS server. If we do not set this, we cannot join the server to the domain.
Date and Time – Confirm that the time zone is correct. Our environment can have multiple issues, if the date and time are off.
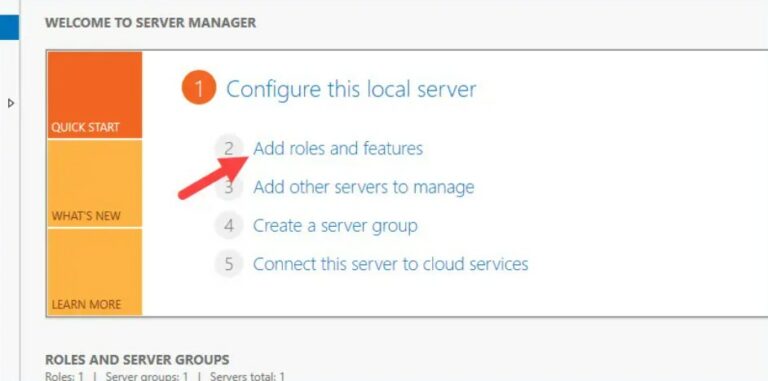
2. Click Next on the Before we begin page. 3. Click Next after selecting Role based or Feature based installation.
Continue with the steps
4. Select the prospective DC from the server pool. Select our server and click Next. 5. Select Active Directory Domain Services (AD DS), and we get a popup to add features our environment requires for Active Directory Domain Services; click Add features. Click Next.
6. Click next on the features page. We do not need to choose additional information on this page. 7. Click Next on the Active Directory Domain Services page. This section of the wizard is for informational purposes. 8. Click Install on the confirmation page.
When the installation is complete, a message appears saying, Configuration required. Installation succeeded on server name. When we see this, we now move to the next step.
Try our Active Directory and Azure AD Reporting Tools
Try us out for Free, Access to all features. – 200+ AD Report templates Available. Easily customise your own AD reports.
Step 3: Promote the Server to a DC
1. In the server manager interface, click the yellow icon at the top and choose to Promote this server to a domain controller.
2. Choose to Add a domain controller to an existing domain. Next, please enter or select the domain to which we want to add the secondary domain controller. We need to click the change button to join in administrator credentials. Click Next.
3. On the Domain Controller Options page, we check the Domain Name System (DNS) server and Global Catalog (GC). Let’s select The Default First Site name for the site name unless we have created a new one. We recommend leaving it as the default value for now. Enter a temporary Directory Services Restore mode (DSRM) password and click Next.
Note: DSRM allows an administrator to repair or recover an Active Directory Database.
Continue with the steps
4. We most likely receive the error shown in the screenshot below. We ignore this message if we don’t need computers outside the network to resolve names within our domain. This article discusses frequent issues and how to diagnose them when installing and removing AD DS later.
5. Select where this server replicates on the Additional Options page. The replication depends on how we installed the first DC and its location. If the DCs are all on the same site, replicating from any will work. We have a different replication strategy, if we have multiple sites. 6. For now, leave the paths in default. We configure it later, but most of the time, the retained default values are fine.
7. Choose Next on the Review options page. 8. On the Prerequisites Check page, we may see two warnings like the below screenshot. If the prerequisite passes, click install.
We have completed adding a secondary DC to an existing domain. Now log into the newly promoted DC and verify a few things.
AD Objects Check
Open the Active Directory Users and Computers console and spot check some user and computer accounts. Then, make sure we connect the ADUC to our new DC. During the installation, the primary DC should have automatically replicated everything to our secondary DC.
It’s also good to check ad replication to ensure no replication errors. From another DC, open the command prompt and enter the repadmin /replsummary computername. Again, we see there are no failures or errors.
Because Active Directory is entirely dependent on the domain name system (DNS), it is critical to ensure that the organization’s servers are operational. If we suspect DNS might be at the root of our problems, then there are two areas to check before we dive into more elaborate ways to troubleshoot Active Directory.
First, double check that we pointed the problematic computer to the correct DNS server. For example, we check the IP address configuration of a Windows machine by running the ipconfigcommand:
ipconfig /all
In addition, DNS problems occur on Windows machines, if expired entries become stuck in the machine’s DNS resolver cache. We clear the cache by using a variation of the IPConfig command:
ipconfig /flushdns
If we suspect a DNS problem, another simple check ensures DNS runs. First, open a PowerShell session on our DNS server and enter the following Get-Servicecommand:
Get-Service DNS
We should see a similar message indicating that the DNS is working. If it isn’t, we start the service by entering the Start-Service command:
Start-Service DNS
If these basic checks have yet to reveal the source of the problem, we may need to use thedcdiag command and run some of its DNS-specific tests, which we review in the next section.
We use dcdiagcommand to perform an Active Directory health check on our domain controller. Run the command dcdiag /v from the command prompt. This command outputs a lot of information, but it is one of the efficient ways to check the health of a DC.
Here is another command that checks for basic DNS functionality:
dcdiag /test:dns /v /s: /DnsBasic
Run Checks on Kerberos
First, ensure that the clocks on our domain controllers, DNS server, and any affected client machines are accurate. Kerberos is a time dependent protocol. Clock skew can cause various issues, including Kerberos failure. If the clocks are out of sync, this is most likely the source of the Active Directory problem.
Another thing to look at is the current list of Kerberos tickets, which we get by typing the klistinto the domain controller’s command prompt. With no parameters supplied, the command retrieves all the tickets logged by the user.
To maintain the integrity of the identity and authentication system, some domain controllers in an Active Directory environment carry out housekeeping duties assigned by flexible single master operation (FSMO) responsibilities. While some roles only apply to a particular domain, others apply to the entire Active Directory forest.
The schema master role is the first of these roles. We cannot change the Active Directory schema, if the schema master fails.
The domain naming master is the second forest level role. This role is responsible for the forest’s namespace. We cannot create or delete domains within the forest if the domain naming master fails.
The relative identifier (RID) master is a domain level role providing the relative identifiers used to generate a security identifier (SID).
The primary domain controller(PDC)emulator is another domain level role that performs domain level functions such as time synchronization and account lockout processing.
The infrastructure master role is the final domain level role. The infrastructure master role updates an object’s SID and distinguished name (DN) for cross domain use.
We use PowerShell to determine the various roles that each domain controller plays. For forest-level roles, use the Get-ADForest:
How to Add Domain Controller to an Existing Domain Conclusion
Adding a secondary DC to an existing domain is an essential step in increasing the reliability and availability of our network. We do this by promoting a server to a domain controller. The steps involved in this process include preparing the server, installing ADDS, and then configuring the new domain controller. By following best practices and paying close attention to details, organizations successfully add a secondary domain controller to their existing domain, ensuring that their network remains up and running despite unexpected failures or disasters.
Try InfraSOS for FREE
Invite your team and explore InfraSOS features for free
Windows Server and VMware SME. Powershell Guru. Currently working with Fortune 500 companies responsible for participating in 3rd level systems support across the enterprise. Acting as a Windows Server engineer and VMware Specialist.
Hallo Marion, do you know how to add existing DC with existing Active Directory from one location to another DC with AD on my location and to make replication? The both DC are fully functional and the location are connected with persisting VPN.


Comment (1)
Alex
May 2, 2023Hallo Marion, do you know how to add existing DC with existing Active Directory from one location to another DC with AD on my location and to make replication? The both DC are fully functional and the location are connected with persisting VPN.